 Web Plan Creation Process
![]() This guide walks you through the complete process of creating a Web Plan in the system. This document is to show you the steps and what options are available in the process. A more comprehensive walk-through of setting up a plan will be available in a separate document.
This guide walks you through the complete process of creating a Web Plan in the system. This document is to show you the steps and what options are available in the process. A more comprehensive walk-through of setting up a plan will be available in a separate document.
 Assumptions
Before starting, ensure the following are already set up:
- Utilities
- Commodities
- Customer Types
- Billing Types
- Terms
- Plan Types
- Cancellation Fee Types
 Web Plans Flow
![]()
Plans > Web Plans
    ↓
Select Market / Utility
    ↓
+ Add New Plan
    ↓
Plan Details
    ↓
Plan Settings
    ↓
Rate Information
    ↓
Calendar
    ↓
Acceptance Options
    ↓
Wizard's Configurations
    ↓
Documents (+ Add Document)
    ↓
Save
 Navigate to Web Plans
![]() From the top menu, go to:
From the top menu, go to:
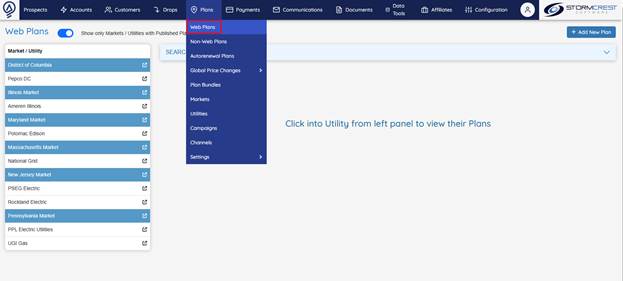
Plans > Web Plans
You will see:
- A left panel listing Markets / Utilities (e.g., District of Columbia, Pepco DC, Illinois Market).
- A toggle: Show only Markets / Utilities with Published Plans.
 Add New Plan
![]()
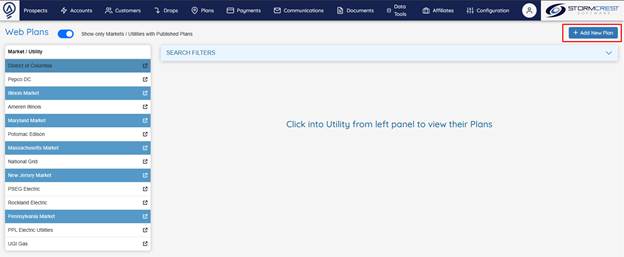
- Select a Market / Utility on the left panel (example: Pennsylvania Market).
- Click the
+ Add New Planbutton on the top right. - This opens the Plan Creation screen.
 Set Plan Details
![]()
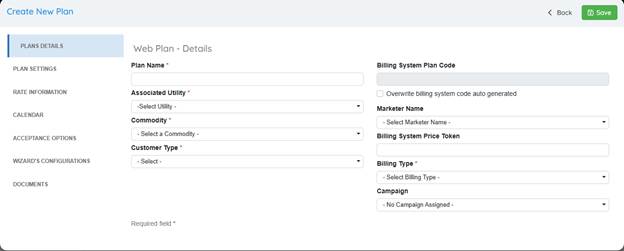
 Required fields
| Field | Description |
|---|---|
| Plan Name* | Name of the plan (public or internal). |
| Associated Utility* | Specific utility for this plan. |
| Commodity* | Electric, Gas, etc. |
| Customer Type* | Residential, Commercial, etc. |
| Billing Type* | Choose the billing model. |
 Optional fields
- Billing System Plan Code (auto or manually entered)
- Marketer Name
- Billing System Price Token
- Campaign (link to tracking)
 Sidebar Tabs
Tabs to configure:
- PLAN SETTINGS — toggles, statuses, channels
- RATE INFORMATION — rates, term length, fees
- CALENDAR — effective and expiration dates
- ACCEPTANCE OPTIONS — e-signature, verbal
- WIZARD'S CONFIGURATIONS — display in wizards
- DOCUMENTS — contracts or terms
 Plan Settings
![]()
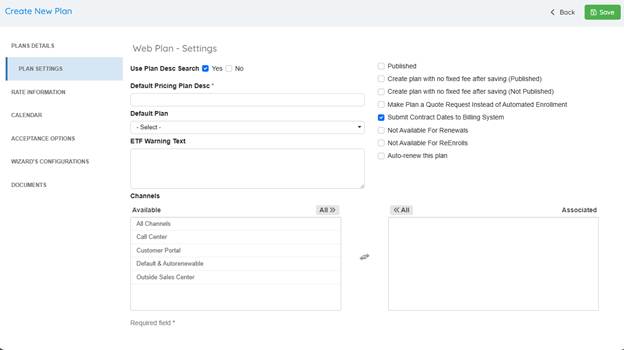
In the PLAN SETTINGS tab, set how this plan behaves.
 Key fields & options
| Field / Option | Description |
|---|---|
| Use Plan Desc Search | Toggle Yes/No to enable description search. |
| Default Pricing Plan Desc* | Required, short description for pricing. |
| Default Plan | Select an existing default plan to base on. |
| ETF Warning Text | Optional warning for early termination fees. |
 Behavior Checkboxes
- ✅ Published
- ✅ Create plan with no fixed fee after saving (Published)
- ✅ Create plan with no fixed fee after saving (Not Published)
- ✅ Make Plan a Quote Request Instead of Automated Enrollment
- ✅ Submit Contract Dates to Billing System
- ✅ Not Available For Renewals
- ✅ Not Available For ReEnrolls
- ✅ Auto-renew this plan
 Channels
Move from Available to Associated:
- All Channels
- Call Center
- Customer Portal
- Default & Autorenewable
- Outside Sales Center
✅ Click Save or move to next tab.
 Rate Information
![]()
On the RATE INFORMATION tab, define financial details.
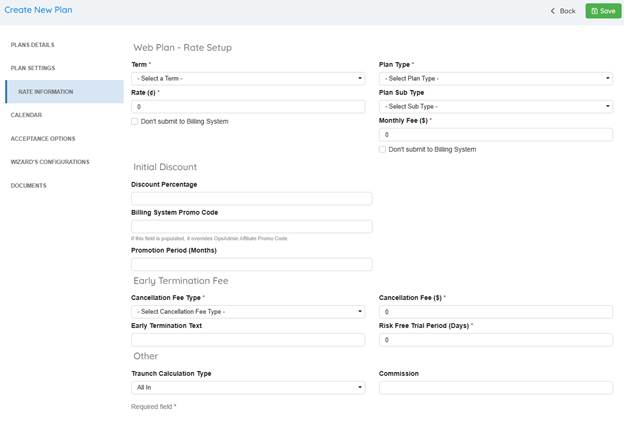
 Main fields
| Field | Description |
|---|---|
| Term* | Select from pre-created terms. |
| Rate (¢)* | Energy rate in cents. |
| Plan Type* | Select from existing plan types. |
| Plan Sub Type | Optional sub categorization. |
| Monthly Fee ($)* | Monthly charge. |
| Don't submit to Billing System | Optional special handling. |
 Initial Discount
| Field | Description |
|---|---|
| Discount Percentage | % discount if applicable. |
| Billing System Promo Code | Overrides affiliate promo code. |
| Promotion Period (Months) | Duration of discount. |
 Early Termination Fee
| Field | Description |
|---|---|
| Cancellation Fee Type* | Select type (pre-configured). |
| Cancellation Fee ($)* | Fee amount. |
| Early Termination Text | Custom explanation. |
| Risk Free Trial Period (Days)* | Trial period in days. |
 Other
Other
| Field | Description |
|---|---|
| Traunch Calculation Type | e.g., “All In”. |
| Commission | Amount if applicable. |
✅ Click Save or move to next tab.
 Calendar
![]()
Set when the plan is active.
| Field | Description |
|---|---|
| Plan Enabled From* | Start date of the plan. |
| Plan Enabled Until* | Expiration date (defaults far out). |
| Future Enrollments Available From | When future enrollments start. |
| Future Enrollments Available Until | When they stop. |
✅ Click Save or move to next tab.
 Acceptance Options
![]()
Define customer confirmations.

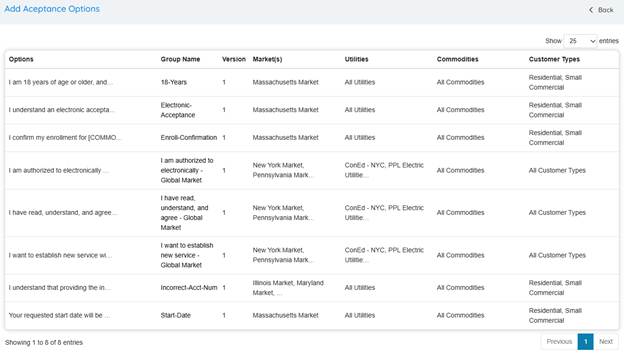
 How it works
- Click
+ Add Acceptance Options. - Select statements such as:
- I am 18 years of age or older
- I understand an electronic acceptance is the same as a written signature
- I confirm my enrollment
- I want to establish new service
✅ Once selected, these statements are tied to the plan.
 Wizard’s Configurations
![]()
Controls how the plan displays in wizards.
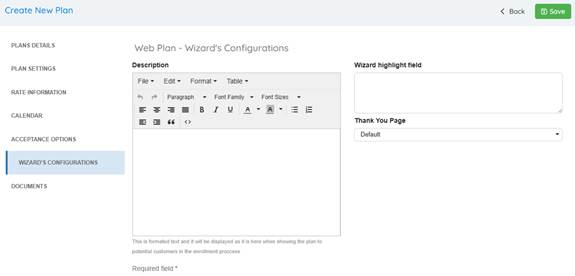
| Field | Description |
|---|---|
| Description | Rich-text shown to customers. |
| Wizard highlight field | Highlights or promo notes. |
| Thank You Page | Select a custom page. |
 Documents
![]()
Attach documents customers will see and sign.
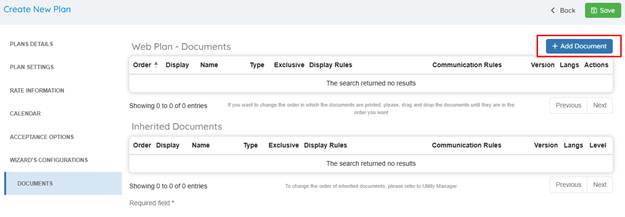
 How it works
- Click
+ Add Document. - Filter by:
- Document Level (plan, market, utility)
- Utility
- Document Type (Contract Summary, T&C)
- Name
- Click Search.
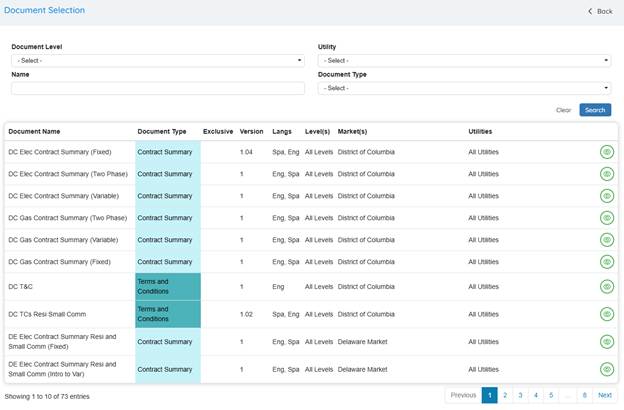
| Column | Meaning |
|---|---|
| Document Name | Name of contract, summary, or T&C. |
| Document Type | Contract Summary, Terms & Conditions, etc. |
| Exclusive | Exclusive to certain plans. |
| Version / Langs | Version, supported languages. |
| Level(s) | Where applied. |
| Market(s) / Utilities | Applicable markets/utilities. |
✅ Click the green eye icon to preview the document. Click anywhere else in the document line to add the document to the plan.
 Complete!
When all tabs are filled, click Save to finish creating your plan.