 Docs & Autoresponders for Prospects
 Document Summary
![]()
This guide explains how to use the Documents and Autoresponders features in OpsAdmin to create personalized, automated communications for prospects.
You’ll learn how to:
-
Set up Document Types to organize different kinds of documents, like contracts.
-
Create Document Templates that automatically fill in prospect information using dynamic fields.
-
Build and manage actual Documents, including versions in different languages.
-
Set up Autoresponders—automated messages triggered by actions in the system.
-
Group these into Autoresponder Packages to send emails or letters based on specific events.
 Definitions
![]()
This reference of definitions explains the key terms used in this and other related documents. Use it to better understand each term and its role within the system.
| Term | Definition |
|---|---|
| Affiliate (Broker) | A partner or third party (e.g., sales broker) that autoresponders can be customized for. |
| Autoresponder | An automated message sent when a specific event or trigger occurs (e.g., contract generated, contract rejected). Often used for email responses. |
| Autoresponder Package | An Autoresponder Package is a group of automated messages and documents that are bundled together and triggered by a specific event in the OpsAdmin system (like a new prospect signing up or a contract being submitted). For example, an Autoresponder Package might include:
|
| Autoresponder Type | A category used to organize autoresponders. Each type can be labeled with a name and color. |
| BCC Email | An optional feature allowing internal teams to receive blind copies of autoresponder communications for tracking or auditing purposes. |
| Class (Email/Letter) | Specifies the delivery format of an autoresponder package—either as an Email or Physical Letter. |
| Document Manager | The section where users create, edit, and manage documents. Supports both file uploads (static PDFs) and dynamic templates. |
| Document Template | A reusable, dynamic structure used to generate documents with auto-filled prospect data. Built using HTML and populated with variable fields like Prospect or Pricing Matrix. |
| Document Type | A label used to categorize documents (e.g., Full Contract). Each document must be assigned a type. |
| Dynamic Field | A placeholder in a template that automatically pulls specific data from the system (e.g., prospect name, plan details). |
| Global Autoresponder | An autoresponder that applies to all markets instead of a specific one. |
| HTML Editor | A built-in tool that allows users to design or paste in HTML content for templates to control formatting and styling. |
| Language Variant | A version of a document available in a different language. Users must create and upload translated versions externally—OpsAdmin does not auto-translate. |
| Mail Priority | Determines the sending speed of emails. "Normal" is standard, but higher settings can prioritize time-sensitive messages. |
| Market | The state in which a document or autoresponder can be customized for. |
| Prospect Package | The prospect package is a series of documents combined and packaged into one or many documents to be sent to Docusign for signing. May also package the documents into a pdf. |
| Package Type | A label used to define the purpose of an autoresponder package (e.g., Welcome Email, Forgot Password). |
| Prospect ID | A unique identifier used to pull in dynamic data from the Prospect Manager when generating sample or live documents. |
| Trigger | An event that causes an autoresponder package to be sent (e.g., a new application is submitted). |
| Utility | A specific energy provider tied to a document or autoresponder. Custom content can be assigned per utility. |
| Version History | A record of changes to a document. Each time a document is saved, a new version is created and tracked. |
 1. Setting up Document Types
![]() What It Is:
Document Types help you organize different kinds of documents, like contracts.
What It Is:
Document Types help you organize different kinds of documents, like contracts.
To Create or Edit:
-
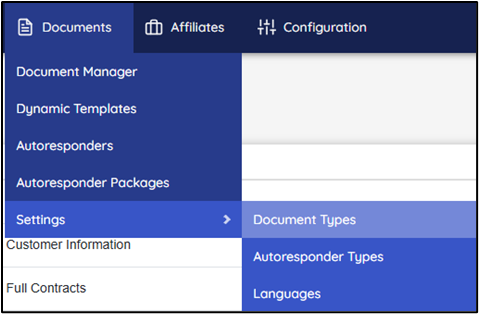
Go to the Document Types section in the menu.
-
Click “+ DOCUMENT TYPE NEW” to add a new one, or click an existing type to edit it.
-
Name your type, select “Prospect Document,” and choose font/background colors for easy identification.
-
Click SAVE.
![]()
1.0 - Menu Location
1.1 - Document Type List
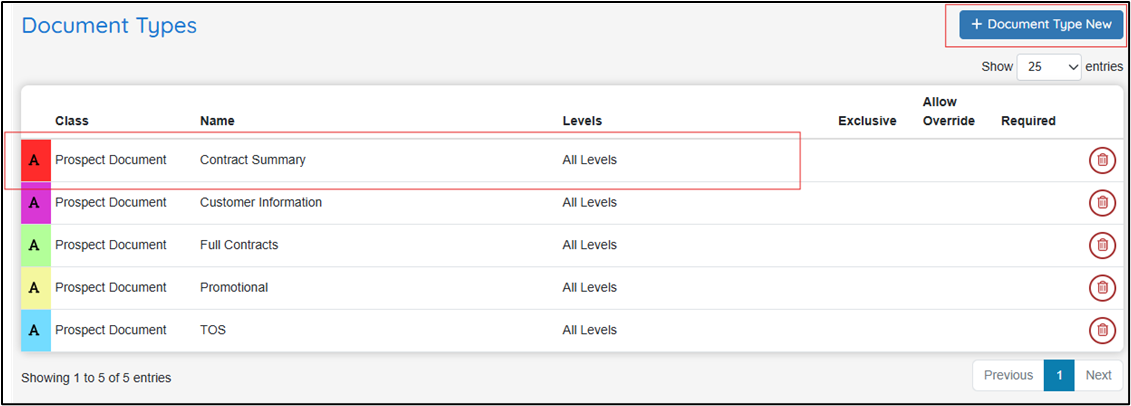
Document Types are used to set up the different types of documents you will be supporting in your system.
Example: If you prefer to create full multipage contracts as a single document, the Full Contract type could be used. You may change the name or create a new type.
-
You may click “+ DOCUMENT TYPE NEW” to add a new document
-
You may click on any pre-existing Document Type to edit
1.2 - Edit Document Types

-
Choose a name for the document type
-
Always choose Prospect Document (Plan Documents are only available in the full version of OpsAdmin)
-
Choose a font color and background color for organization of your types in the document listing
-
Supplemental documents are available if the broker wants to upload additional documents and will appear in the prospect generation screen as discussed in the Generating a Prospect section.
-
Click “SAVE” and your document type will be created
 2: Creating a Document Template
![]() What It Is:
Templates let you create documents that automatically fill in data from a prospect’s profile. Document templates are the foundation of creating dynamic data documents that will automatically populate data using the prospect information. You must create a template in order to add a template to the document.
What It Is:
Templates let you create documents that automatically fill in data from a prospect’s profile. Document templates are the foundation of creating dynamic data documents that will automatically populate data using the prospect information. You must create a template in order to add a template to the document.
Steps to Create:
-
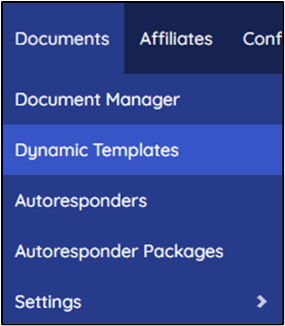
Go to the Dynamic Templates section and click “+ New Dynamic Template.” **
-
Name your template and assign it a document type.
-
Use the HTML editor to paste your HTML-formatted document. This gives you better formatting control.
-
Click the dynamic fields (like Prospect or Pricing Matrix) to insert data placeholders into your document.
-
Test your template by generating a sample PDF using a Prospect ID from Prospect Manager.
![]()
2.0 - Menu Location
2.1 - Create a Dynamic Template
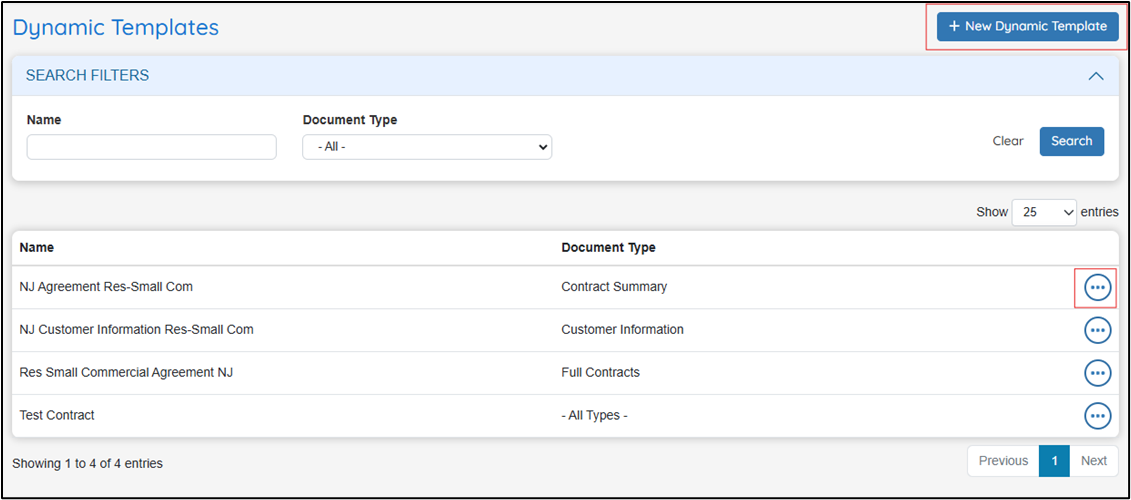
- First you need to create a template by clicking “+ New Dynamic Template.”
- If you are editing, search for the template you wish to edit (using the filters if necessary) and click on the template.
2.2 - Edit/Design Your Template
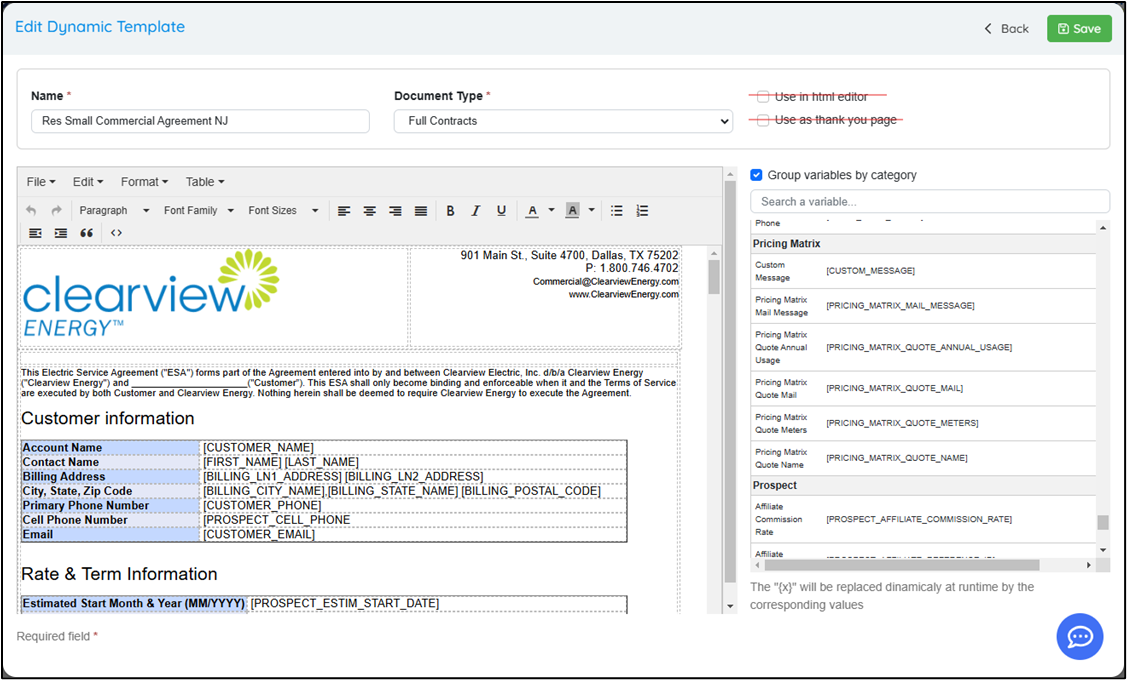
-
Assign a name to your template that will be used to create your new document.
-
Choose the type of document this template is going to be using for organization.
-
You can ignore the “html editor” and “thank you page” check boxes.
-
You may begin editing your document template. We suggest you convert your existing documents to html format and paste the html into the html editor shown below. This will help you in your process of perfecting the look and feel of your template.
2.3 - Edit Using HTML Editor for Best Results
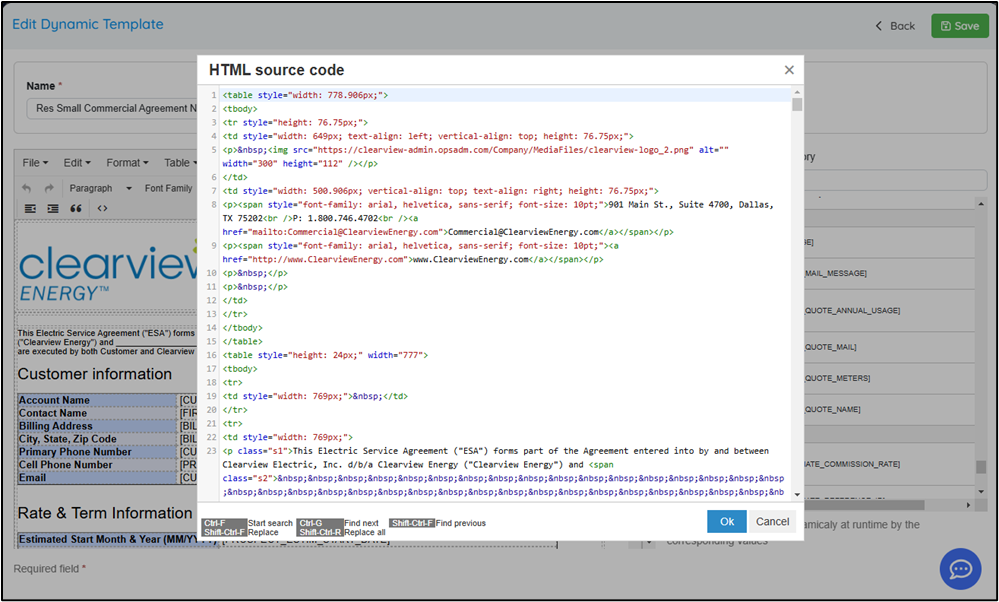
-
Click this button
in the editor icon window to load the html editor. Copy and paste your html code into the editor and click OK.
-
You may choose to simply edit without html. However, the best practice is to edit with an html editor even if using an external editor first before copying and pasting the code.
2.4 - Generate a Sample PDF

It’s important to test any changes before adding the template to an existing document. Once you have saved your template, click
the three button icon to expand your view and Generate a sample PDF.
- When you generate a document, you will need a prospect ID number to generate with dynamic data. This will be available in the Prospect Manager.
2.5 - Insert Dynamic Data Fields into your template
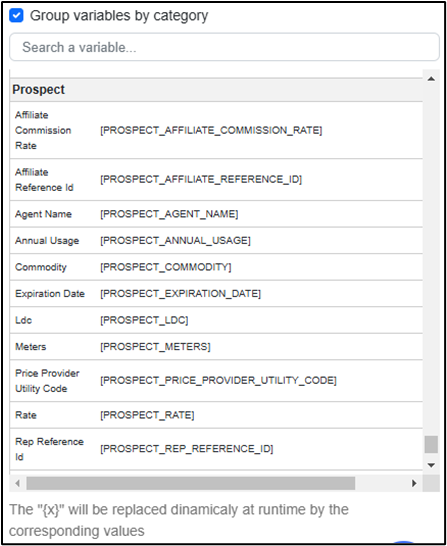
- When clicking any of the dynamic fields on the right side of the editor, it will place the dynamic field into your document where your cursor is.
- Primarily the Prospect and Pricing Matrix variables will be most common but all the sections of the variables should work unless they have the term ENROLL_ in front of them.
2.6 - Test the look and feel of the template before adding it to a document

- Simply look in the Prospect Manager field and choose any prospect ID and place it here to generate the sample contract.
- If you do not use an ID, the document will not be created.
 3: Adding/Creating Documents
![]() What It Is: This is where you create actual documents that are used for contracts.
What It Is: This is where you create actual documents that are used for contracts.
Steps:
-
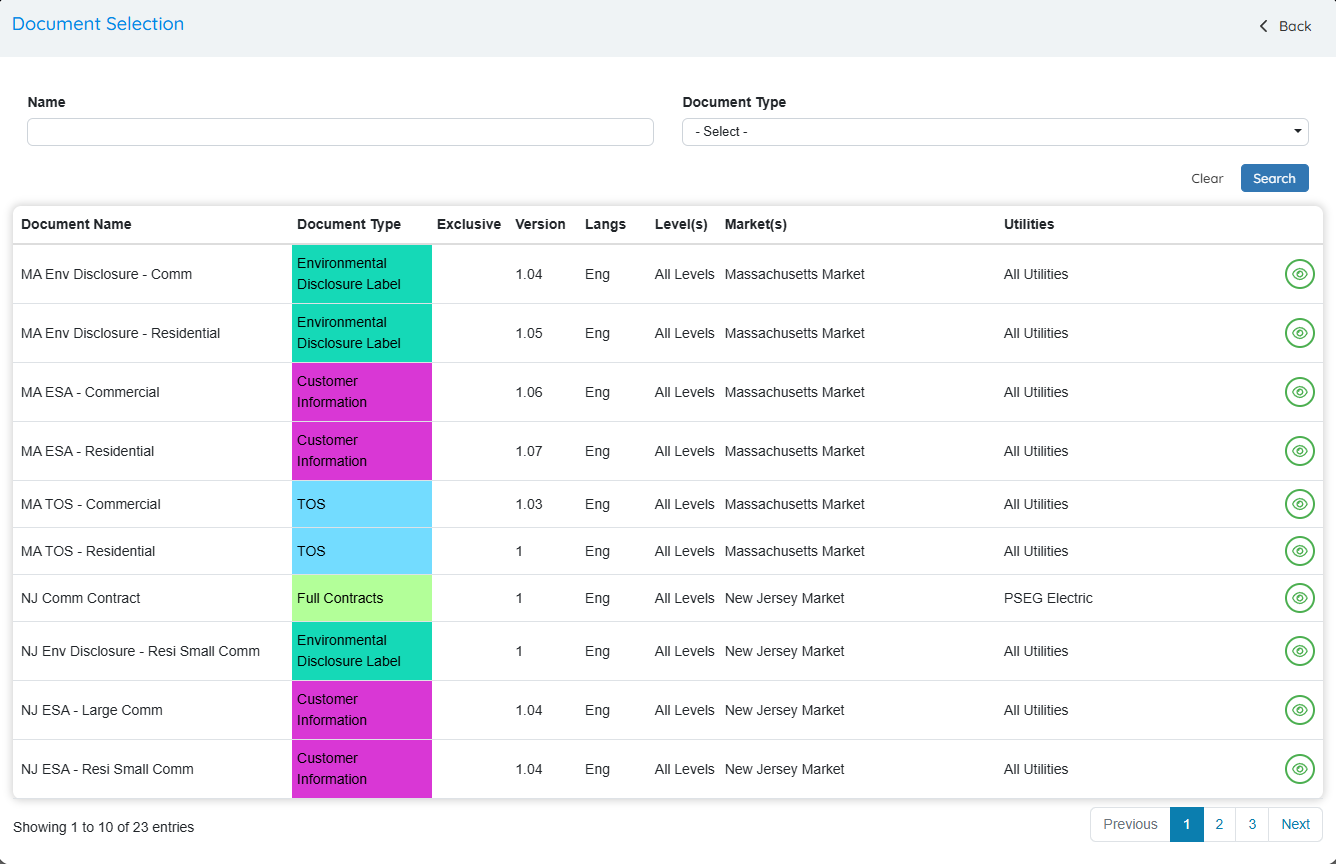
Go to the Document Manager and click “New Document” or choose an existing one to edit.
-
Enter the document name, select the Document Type, Market, and Utility.
-
Click “Add Language Variant” to upload a PDF or choose a Dynamic Template.
-
If uploading a file, note that it won’t use dynamic fields.
-
If using a template, select it, review the preview, then click SAVE.
-
The system tracks version history, so you can always view or revert past versions.
![]()
3.0 - Menu Location
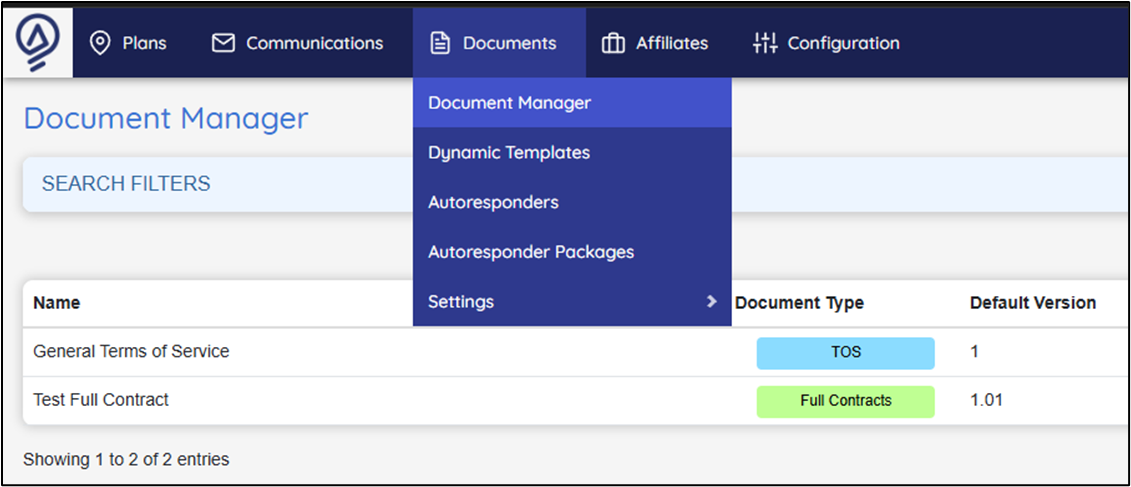
-
Select Document Manager under the Documents tab on the main menu.
3.1 - Add or Edit an Existing Document

-
Click on an existing document if you are attempting to make an edit.
-
Click on “New Document” if you are attempting to create a new document.
3.2 - Choose/Enter the Document Details
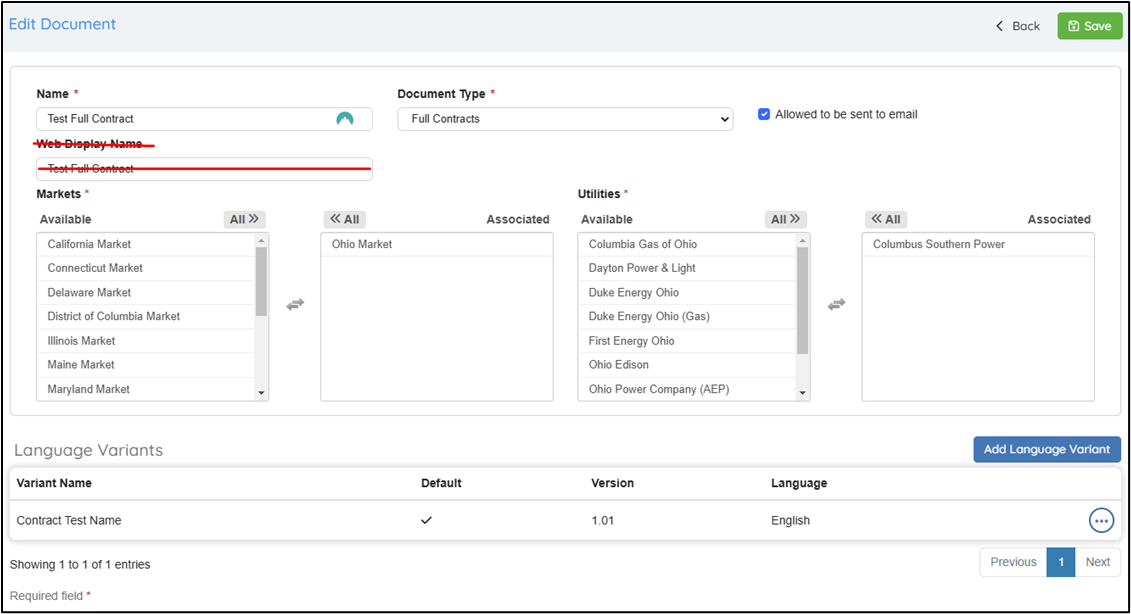
-
Assign a name to the document.
-
Add the “Document Type” that corresponds to this document (Document Type Setup).
-
Select the Markets and Utilities that are associated with this document.
-
After you have followed the steps above, select “Add Language Variant.”
-
Disregard the Web Display name for this document.
3.3 - Add a Document (Language Variants Available)

-
Assign a name to the file.
-
Select which language this document is written in.
-
Choose a “Version Type” (File or Template).
-
If uploading a file, choose the file and select ok.
-
If you are adding a template, toggle the template option and choose which template you would like to add, then select ok.
3.4 - Upload a File or Add a Template
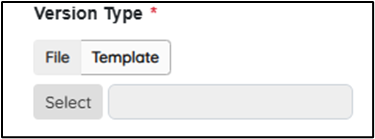
-
Click file and it will open an uploader to upload a PDF into the system. This WILL NOT utilize the dynamic field functionality.
-
Click Template to utilize a Dynamic Template that you have created previously.
-
Click SELECT and the below pop-up window will appear.
3.5 - Select the Template You Wish to Add
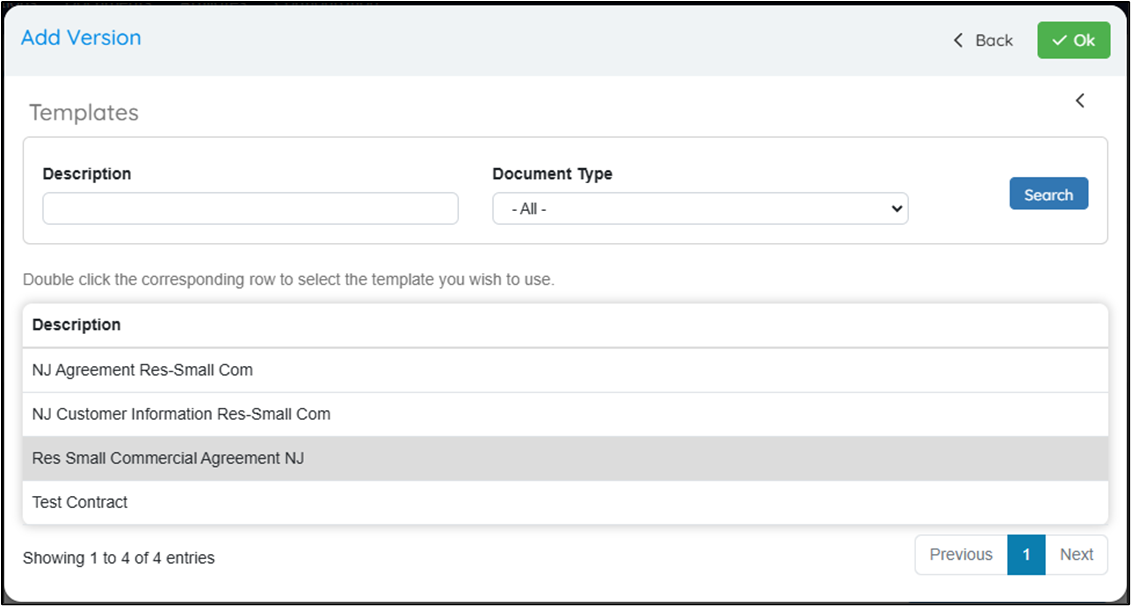
- Select the template that will be used in your document. \
- Click OK and the template will be added to your document but not saved until the next step.
3.6 - Selected Template will display in box
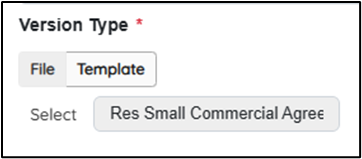
- You will now see the template that will be used in your document. Make sure it is the correct template before saving your document.
3.7 - Save the Document
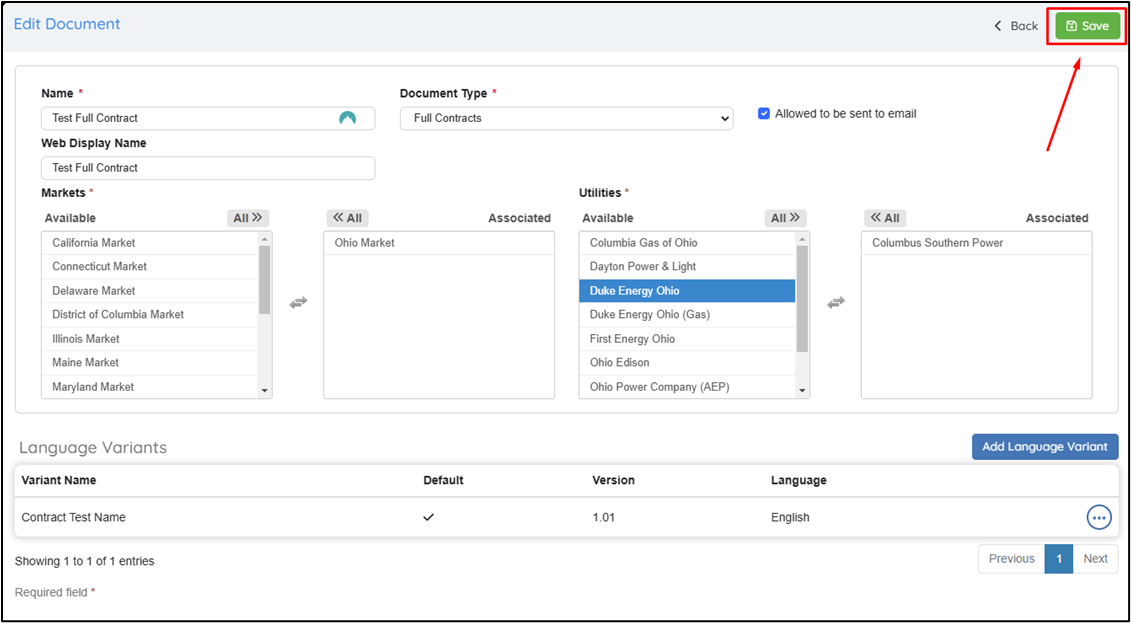
-
Simply SAVE the document and the version will change and the document has been updated.
3.8 - The Version will change once save

- You will now see that the version you saved will be changed.
3.9 - Expand the Version History and See Historical Changes

You may click the
and select the previous version to see all the version history for a selected document.
 4: Multi-Language Capabilities
![]()
What It Is: You can store documents in multiple languages for different customer needs.
![]()
4.0 - Ability to Manage Multi-Language Variations of Documents

OpsAdmin provides you the ability to manage documents in multiple language formats based on the preferences of the prospect or customer.
4.1 - Menu Location
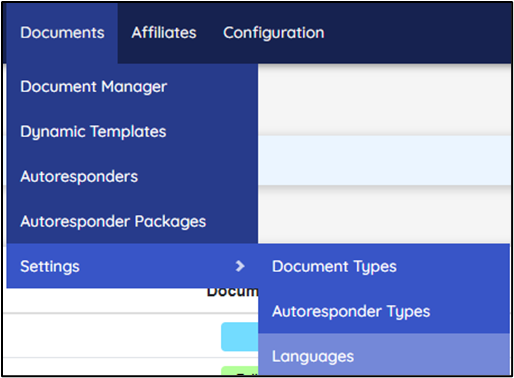
4.2 - Add a Language
- Simply add a Language to your Language list. The system is not translating for you. You must manage the translations outside of the system.

 5: Setting Up Autoresponder Types
![]() What It Is: These help you organize autoresponders into categories.
What It Is: These help you organize autoresponders into categories.
To Create or Edit:
-
Go to Autoresponder Types in the menu.
-
Click New Autoresponder Type or edit an existing one.
-
Name it and pick font/background colors for organization.
![]()
5.0 - Add a Autoresponder Type
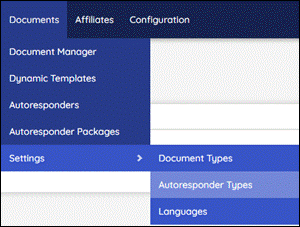
5.1 - Add a New Type

- Click New Autoresponder Type to create a new type.
- Click on an existing Autoresponder Type to edit.
5.2 - Edit / Label the Autoresponder Type
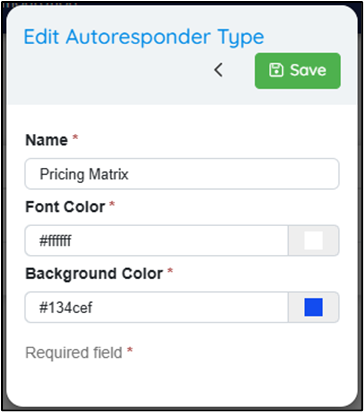
-
Name the autoresponder type for organization. -
Choose a font color and background color.
 6: Setting Up Autoresponder Packages
![]() What It Is: A package groups autoresponders and documents together. Most often, these are used for automated emails.
What It Is: A package groups autoresponders and documents together. Most often, these are used for automated emails.
Steps to Set Up:
-
Go to Documents > Autoresponder Packages.
-
Click New Autoresponder Package.
-
Name your package and choose the package type.
-
(Optional) Check boxes to customize by Market or Utility if you want different content for different regions.
-
Define Triggers (what action sends the package), Class (email or letter), BCC (blind copy), and Mail Priority (Normal is usually fine).
![]()
An Autoresponder Package is a structure that combines Autoresponders and Documents to form a package to a prospect or customer. These elements can be Letters + Physical Documents or Emails. The primary use for Broker OpsAdmin will be emails.
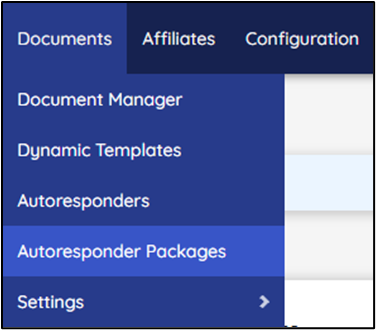
To create a new Package, go to “Documents” then “Autoresponder Packages” from the Menu:
6.0 - Menu Location
6.1 - Add / Edit an Autoresponder Package
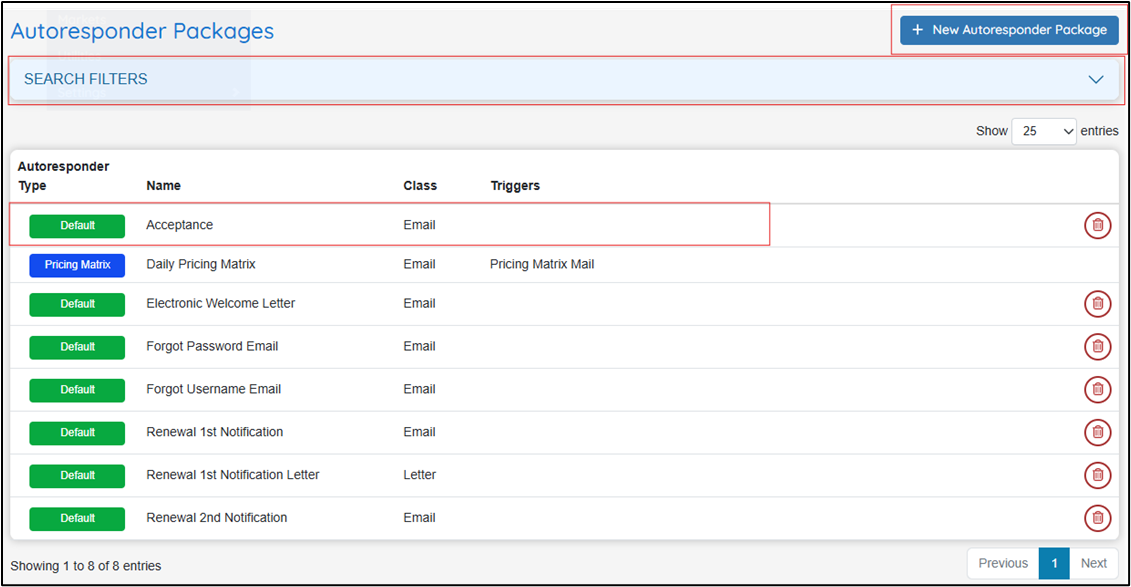
-
Click New Autoresponder Package to create a new package.
-
Click Search Filters to expand the filter view. \
-
Click on an existing Autoresponder Package to edit.
6.2 - Create the Package
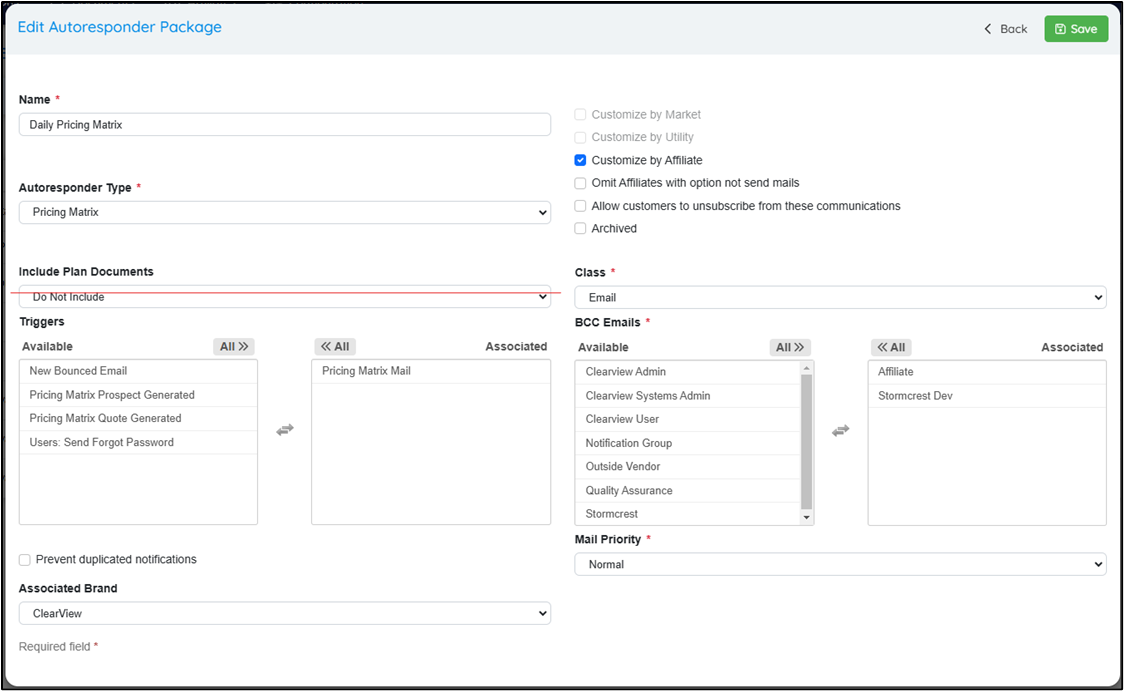
- Name Your Autoresponder Package
- Provide a clear and descriptive name for the package.
- Choose the Package Type
- Select the type of Autoresponder Package for organizational purposes. This type should have been created in an earlier step.
- Include Plan Documents (Optional)
- This feature is part of the full version of OpsAdmin and can be ignored if not applicable.
- Customize by Market
- Activate this checkbox if the package needs to be tailored for different markets.
- For example, a “Forgot Password” email applies globally and doesn’t depend on the market. However, market-specific content like contract introduction letters may require customization.
- Customize by Utility
- Enabling this checkbox will allow you to select Utilities from a dropdown when creating documents within the package.
- This is useful for sending specific documents to prospects tied to particular utilities.
- Triggers
- Triggers define the actions a package performs when a specific service is executed.
- For the initial release, Stormcrest will create foundational packages and assign the appropriate triggers to demonstrate how the system works.
- Class
- Specify whether the package is for an email or a letter.
- BCC Emails
- Use this feature to send a blind copy of any package to a designated department when a trigger is activated. This keeps your staff informed about specific actions or information.
- Mail Priority
- Mail priority determines how quickly emails are processed in the queue. The "Normal" setting is sufficient for most cases unless you're sending thousands of emails daily.
 7: Create an Autoresponder
![]() What It Is: Autoresponders are automated messages sent based on actions or triggers.
What It Is: Autoresponders are automated messages sent based on actions or triggers.
Steps to Create:
-
Go to Documents > Autoresponders.
-
Click + New Autoresponder or edit an existing one.
-
Name it and assign it to a Market or select “Global” if it applies to all markets.
-
Choose an Autoresponder Package and optionally link it to a specific Affiliate (Broker).
-
Use the editor to write your message and insert variables from the right-hand list (especially Prospect and Pricing Matrix fields).
-
Click OK to save.
![]()
7.0 - Menu Location
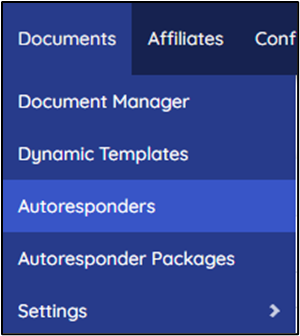
- Select Autoresponders under the Documents tab on the main menu.
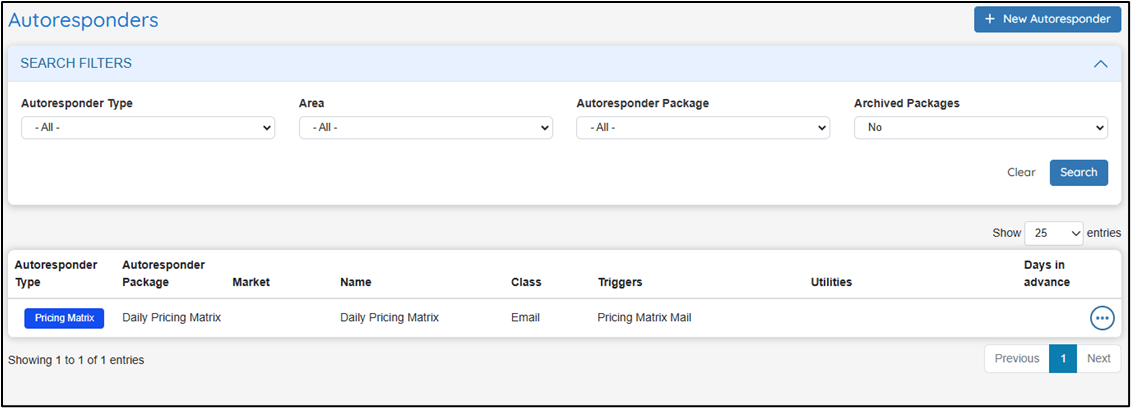
7.1 - Add / Edit an Autoresponder
-
If you need to create a new Autoresponder, select “+ New Autoresponder.”
-
If you are editing an Autoresponder, click on an existing document.
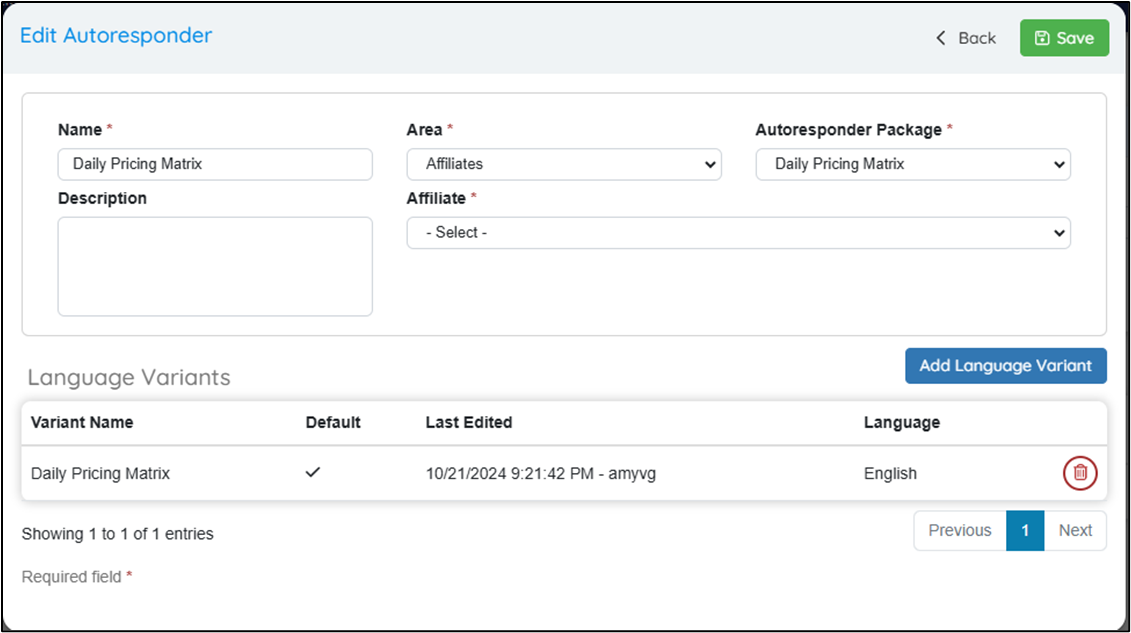
7.2 - Label Your Autoresponder
-
Enter a name for the Autoresponder.
-
Select the area (Market) the Autoresponder will be linked to.
- If you choose “Global Autoresponders,” the Autoresponder will be connected to all markets.
-
Pick the Autoresponder Package to associate with this Autoresponder.
-
If you would like to customize an Autoresponder for a specific Affiliate (Broker), you may do so:
-
Choose the Affiliate to link with the Autoresponder.
- If no affiliate applies, select “without affiliate” from the dropdown menu.
-
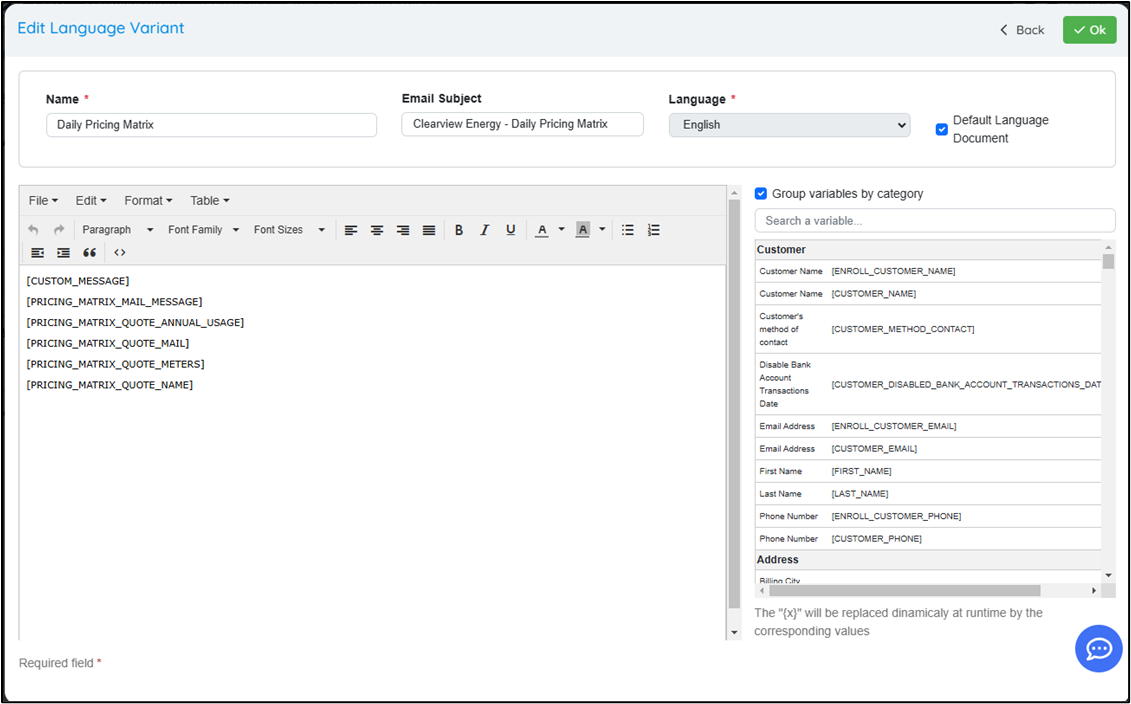
7.3 - Create Your Autoresponder
-
Enter a name for the Autoresponder.
-
Use the editor to add the variables you want to include in the Autoresponder.
-
If you're unsure which variables to use, refer to the list of variables that will be provided to you separately. You may test the variables. Primary variables for the Broker OpsAdmin Tool will be Prospect and Pricing Matrix. You can simplify your view by searching for variables on the right side of the editor.
-
Once all desired variables are added, click “OK” to save your Autoresponder.
 8: Prospect Packages
![]() What It Is: Much like Autoresponder Packages, a Prospect Package is created to build the contracts that will be submitted to the potential customers based on the Market/Utility and Customer Type.
What It Is: Much like Autoresponder Packages, a Prospect Package is created to build the contracts that will be submitted to the potential customers based on the Market/Utility and Customer Type.
Steps to Create:
-
Go to Documents > Prospect Packages
-
Click + Add New Prospect Package or edit an existing one.
-
Name it and assign it to a Market and All Utilities Applicable
-
Select a Customer type
-
Choose an Autoresponder that will be sent to the customer acknowledging that a Docusign contract is on the way (also known as a Notification of Contract Delivery)
-
Select the Documents that will be used in the package. Make sure to include a Signature document.
-
Click SAVE to save.
![]()
8.0 - Menu Location
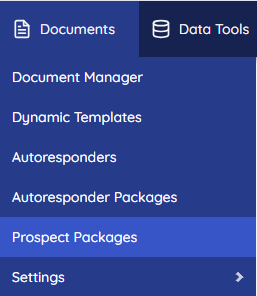
8.1 - Add a New Prospect Package
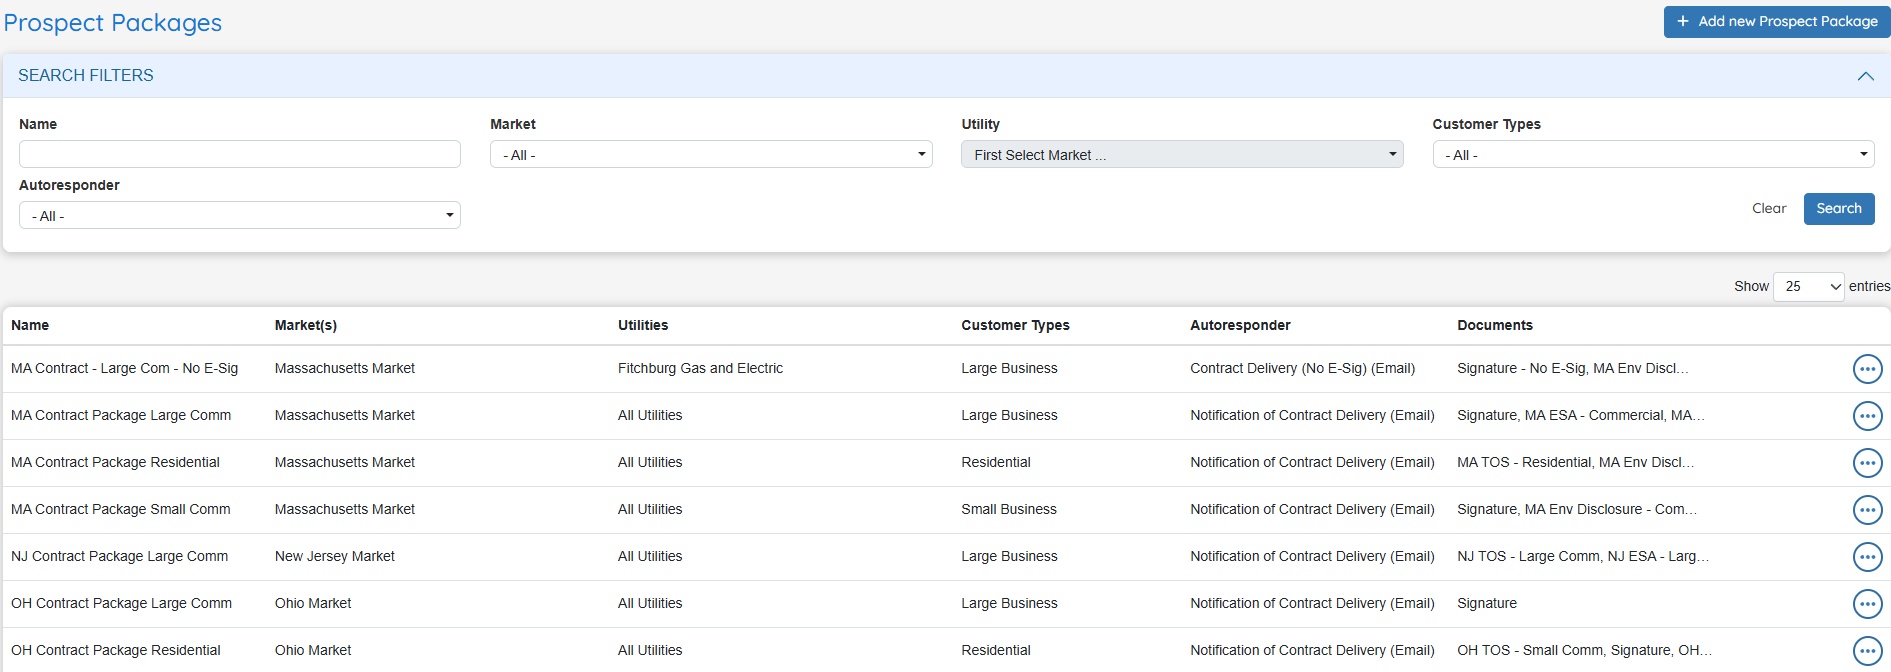
- Click Add a New Prospect Package at the top right of the page
8.2 - Fill in the required information
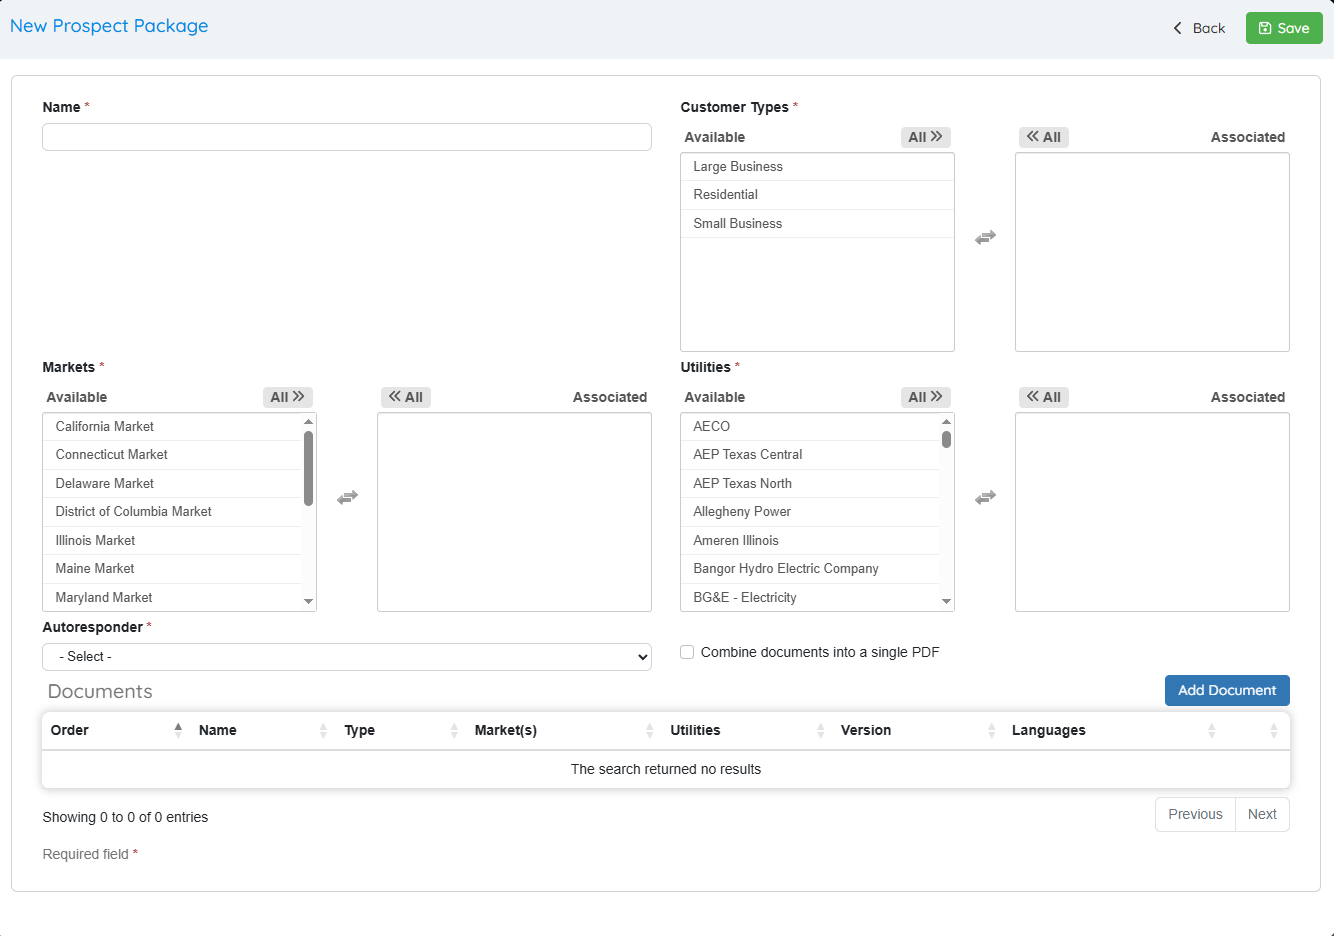
- Enter the name of the Package
- Select Customer Type, Market and Utilities that this document is available for.
- Choose the autoresponder that you would like to send to the customer notifying them that a contract will be sent to them by Docusign.
- You may choose “combine documents” if you want a single PDF file sent. If you do not select this, the documents will be separated into individual files. If they are separated, they will not go to Docusign.
- Add Documents to the package. These documents should contain all the pages of the contract that needs to be signed and returned by a customer.
- SAVE your package
