Pricing Portal and Prospects
Document Summary
![]()
The Pricing and Prospect system enables third-party affiliates to:
- Access supplier pricing,
- Generate customer prospects, and
- Manage the full contract approval process for energy enrollment.
Once an affiliate receives login credentials, they can navigate the Pricing Matrix to filter available rates by market, utility, and customer type.
After selecting a rate, the affiliate generates a Prospect, fills out customer and account details, and uploads the necessary documents, either through a digital DocuSign or physical contract upload process.
The system automatically emails agreements to customers for signature (digital process) and updates the prospect status once all parties have signed.
Both Brokers and REP Administrators can manage prospects post-submission.
- Brokers track and update deals through the Prospect List
- REPs oversee all entries in the Prospect Manager, where contracts and prospects can be approved, rejected, or revised.
Approving a contract requires sequential confirmation for both the contract and the prospect, while rejections can occur at any time. The platform maintains a complete history of activity and status changes, ranging from Pending Review and Unsigned to Completed, ensuring transparency and streamlined collaboration between affiliates and REPs throughout the enrollment process.
Affiliate Login and Portal Access
![]()
Once a third party affiliate has been set up and given login credentials, he/she will be able to access the Pricing Matrix and generation through the Pricing Portal.
Navigating the Pricing Matrix
![]()

The Pricing Matrix screen provides affiliates with access to supplier-designated pricing available for sale. It also enables the submission of deals, referred to as “prospects,” for approval and customer enrollment.
The Prospect List section allows affiliates to track submitted prospects and monitor their current status in real time.
Selecting a Rate to Generate Prospect
![]()
1. Enter Pricing Matrix Details
The affiliate (broker/partner) begins by filling in the required fields on the Pricing Matrix screen to price a deal.
|
|
|

2. Search and Filter Pricing
-
 Click “Search” to apply filters and display available pricing.
 -
 Click “Clear” to reset the fields and start over.
 -
Refine results further by specifying usage tiers and adding broker commission.
- Usage tier may not be visible if not applicable.
-

-
Hide Company Margin From Prices is an administrative function that should only be available to Pricing Portal Administrators who want to see the raw pricing.
![]() This permission should be disabled by default to Affiliate users.
This permission should be disabled by default to Affiliate users.
3. Select Pricing and Generate a Prospect
- Once all filters on the left hand of the screen have been selected, the affiliate will now see the pricing available based on the fixed term and customer’s preferred start month.
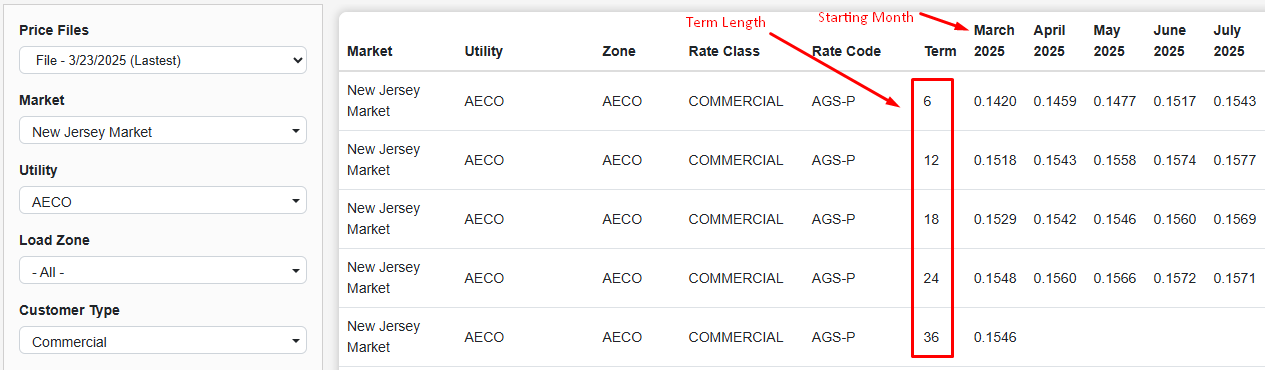
- Once the customer and the affiliate have agreed on a rate and term, the affiliate should select the rate.

 Once a rate is selected, the affiliate should click “Generate.”
Generating a Prospect
![]()
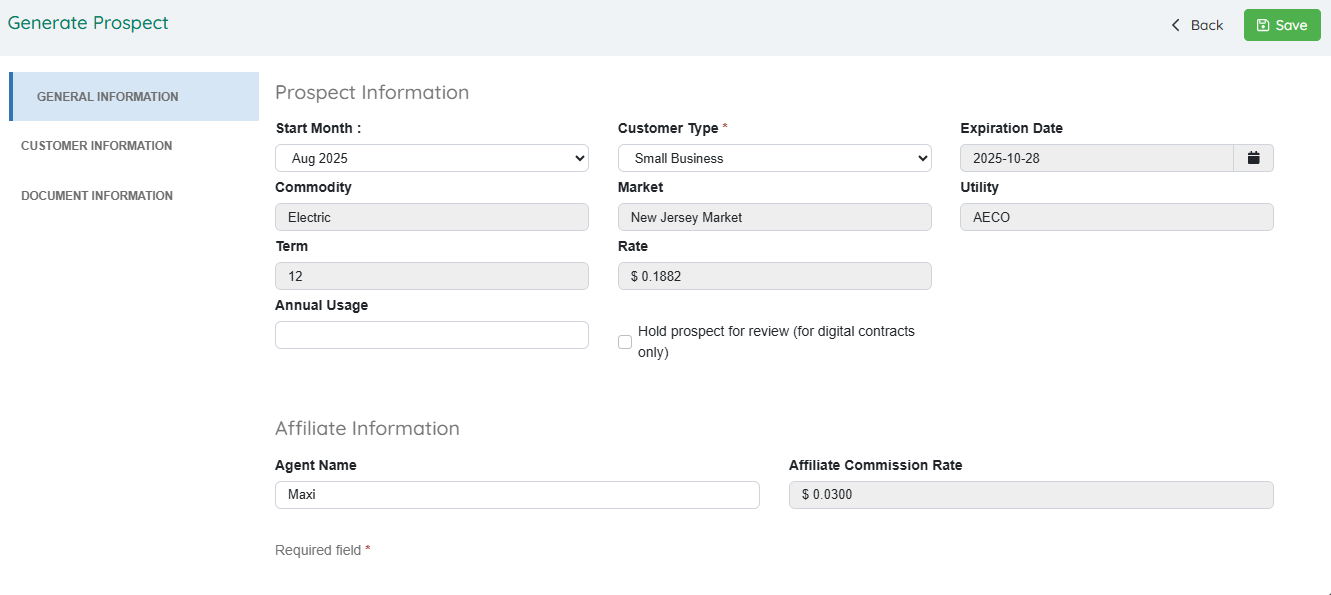
1. Configure Prospect Details
On the Generate Prospect screen, review and confirm the pre-populated fields (auto-filled from prior pricing selections):
- Start Month
- Customer Type
- Expiration Date (based on term selected)
- Commodity
- Market
- Utility
- Term
- Rate
- Usage Tiers (Only shown if applicable)
- Agent Name (From the Affiliate set up screen)
- Affiliate Commission Rate (prior screen’s “Add Broker Commission”)
The following fields are optional:
- Annual Usage
- Hold prospect for review (used for digital contracts only)
- Before you can save the Prospect, click “Customer Information” and “Associated Documents” in the left menu; enter customer contact details and select the appropriate contract type.
2. Customer Information
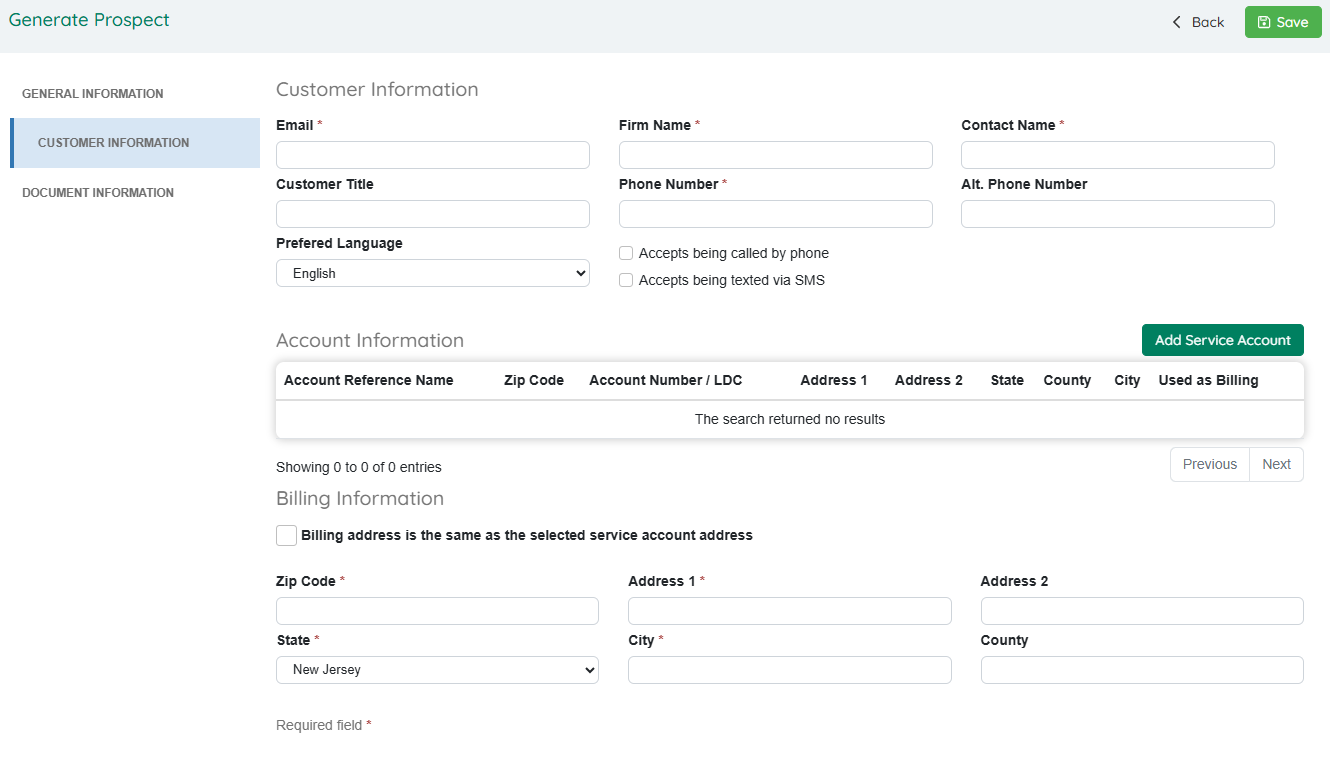
In the customer information area, enter all the necessary customer data. This will include Customer Information, Account Information and Billing Information.
![]() To add service addresses (locations) click Add Service Account:
To add service addresses (locations) click Add Service Account:
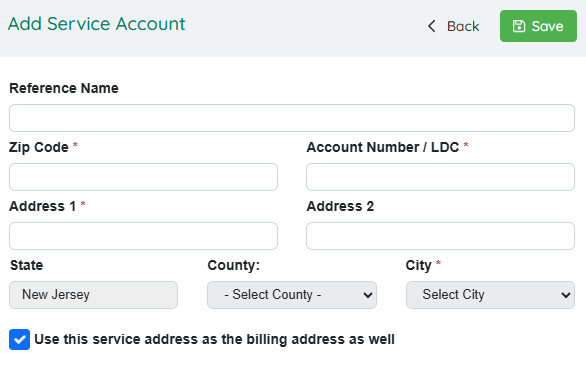
The Reference Name is a custom label used to identify a specific customer location.
Enter a name that helps you easily recognize or reference this location within the system.
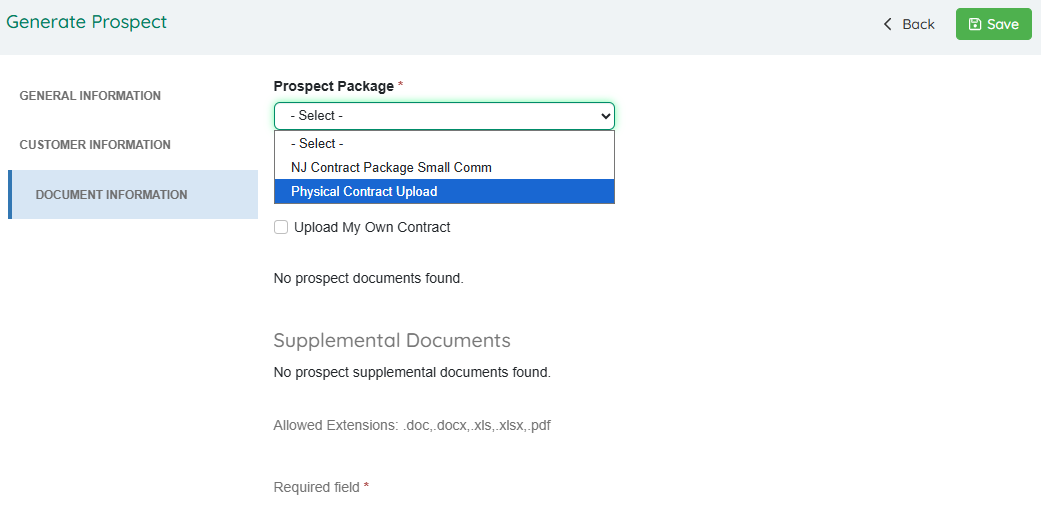
3. Document Information
3a. Using the Digital Contract Process (Docusign)
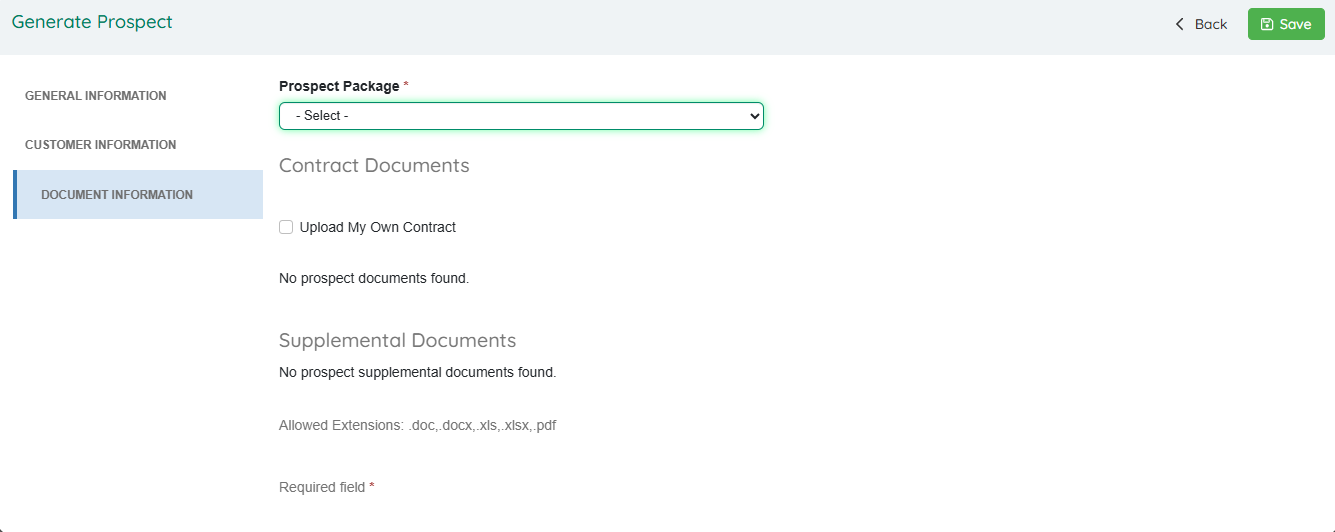
There are two types of documents you can select: (1) Prospect Package Documents or (2) Supplemental Documents.
-
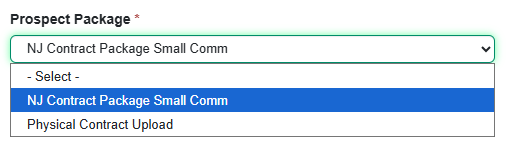
Prospect Package
The Prospect Package document is the contract associated with the specific account type. If multiple options are available, choose the one that matches the customer type. For example, if the customer is a large commercial account rather than a small business, be sure to select the appropriate contract.
- The Prospect Package determines which documents are included in the agreement PDF (based on the customer’s state and utility).
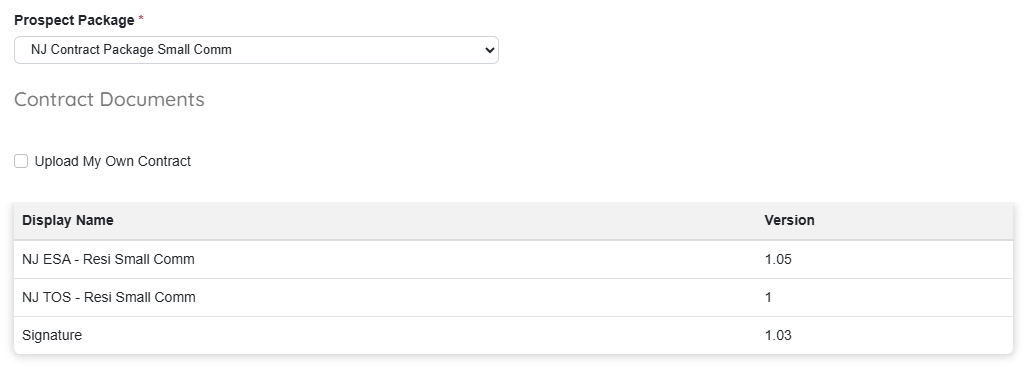
You will see the associated documents included with the selected digital Prospect Package.Each document displays its version number for your reference.
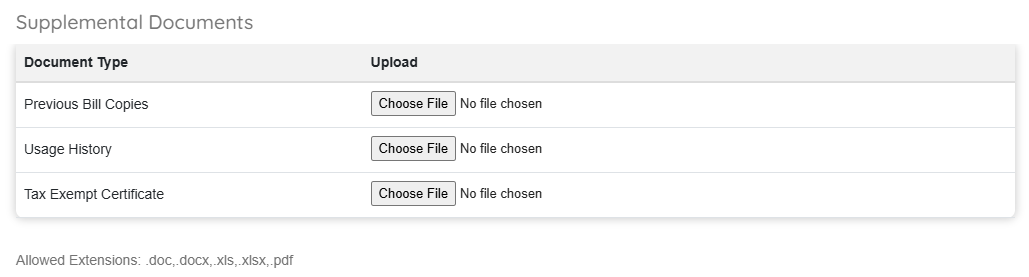
- Supplemental Documents
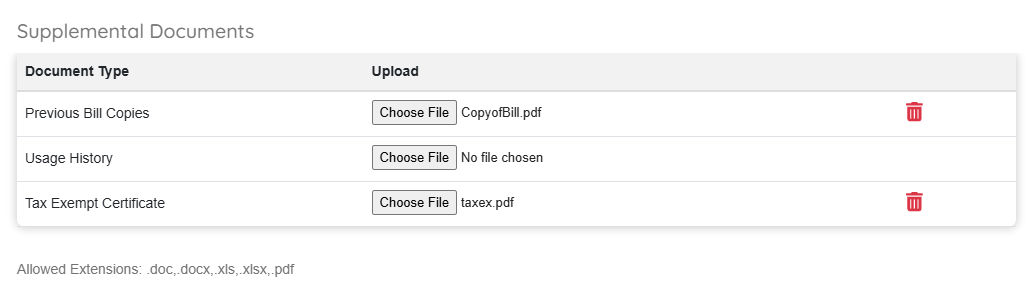
Supplemental Documents are documents that are not required but may be either useful or necessary in order for the contract to be accepted. These documents may be uploaded in pdf, docx, doc, xls or xlsx format.

Choose a file from your computer and upload it to attach supporting documentation to the Prospect.
The file will be shared with the REP once the Prospect is saved.
You may delete and re-upload the file at any time if updates are needed.

|
Once completed and “Saved”, you will see a message that confirms that the prospect has been generated. |

|
If selected, the prospect will be set to On Hold Status. |
Finalize and Send Agreement (Digital Contract)
- After clicking “Save” to generate the prospect, a confirmation message will appear and the system will automatically email the agreement PDF to the customer.
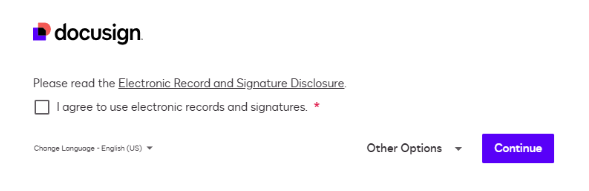
- The customer can sign the agreement via DocuSign.
Final Confirmation
When all parties have signed the Contract, the system will automatically update the status in the Prospect Manager.
At this point, the deal is complete, and the prospect is officially enrolled.
3b. Using the Physical Contract Process
- Click on Document Information tab. In Prospect Package, select Physical Contract Upload.
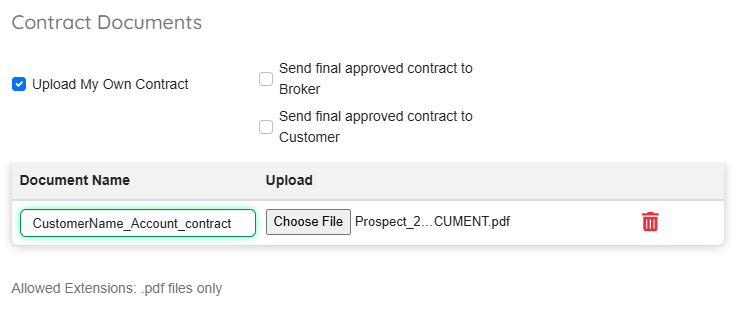
- Select Upload My Own Contract
- You will have the option to send the approved contract to the customer and the broker. Select either checkbox when applicable.
- Enter your document name and choose the file you want to upload.
File naming (recommended for consistency):
CustomerName_AccountOrLDC_YYYYMMDD_contract.pdf
CustomerName_AccountOrLDC_YYYYMMDD_LOA.pdf`
-
Upload Supplemental Documents:
-
Upload any supporting documents required for the Prospect or Contract review process here.
-
If these documents are not yet available, they can be added later through:
- Prospect List – for Affiliates
- Prospect Manager – for REPs
-
-
Finalize and Send
- Click Save. → The Prospect is created and routed to Prospect Manager/REP for review.
Managing Prospects
![]()
There are two ways to manage Prospects in the system:
-
Affiliate (Broker) – Brokers can manage Prospects through the Prospect List located in the Pricing Portal.

-
REP Administrator – Administrators can access the Prospect Manager in the OpsAdmin backend, where they can view and manage all Prospect entries from every user in the system.

Broker Prospect Management Post-Submission
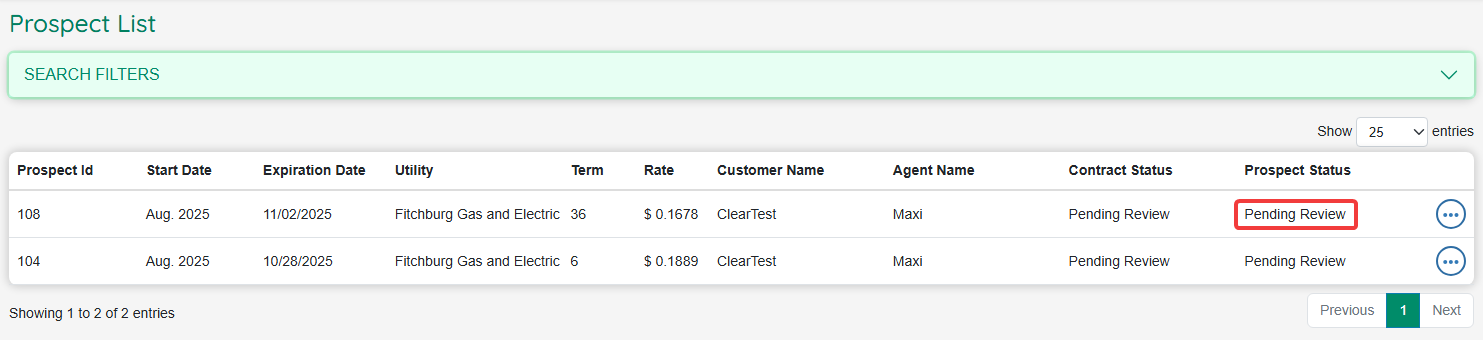 Navigate to “Prospect List” to track all submitted prospects.
The Prospect List displays each prospect’s current status.
-
The initial status of any submission will be Pending Review, On Hold, or Unsigned.

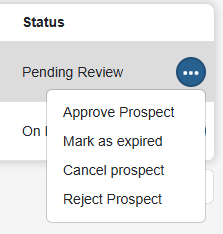
Brokers can Cancel a Prospect or Mark it as Expired. Any change made will automatically be communicated to the REP Administrator.
The Prospect List shows the current status of each Prospect. New submissions will initially appear with one of the following statuses:
- Pending Review
- On Hold
- Unsigned
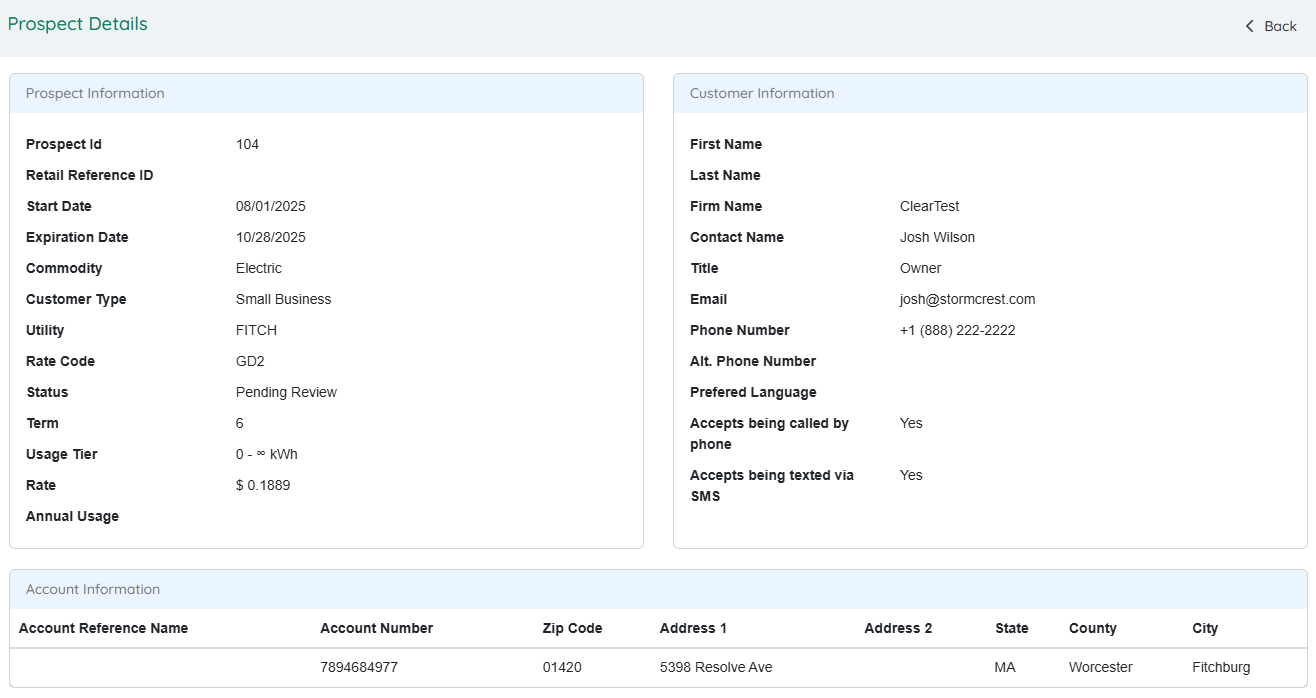
When a Prospect is selected, the Prospect Details screen displays a comprehensive view of the submitted contract information.
Please note that Broker information cannot be edited after the initial submission.
In the lower section of the Prospect Details screen, Brokers can:
-
Manage their portion of the contract process
-
Upload new documents or update any files previously shared with the REP
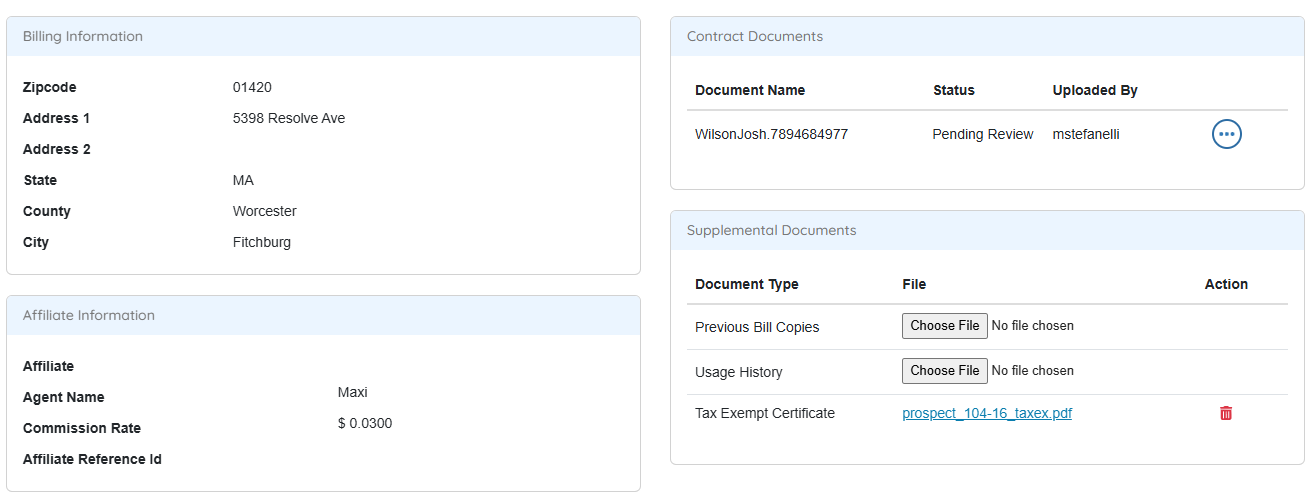
Within the Contract Documents section of the Prospect Details screen, Brokers can:
-
Download a copy of the uploaded contract
-
Upload an updated version when changes are required
This area facilitates the back-and-forth communication between the Broker and the REP whenever additional information or revisions are needed.
REP Prospect Management
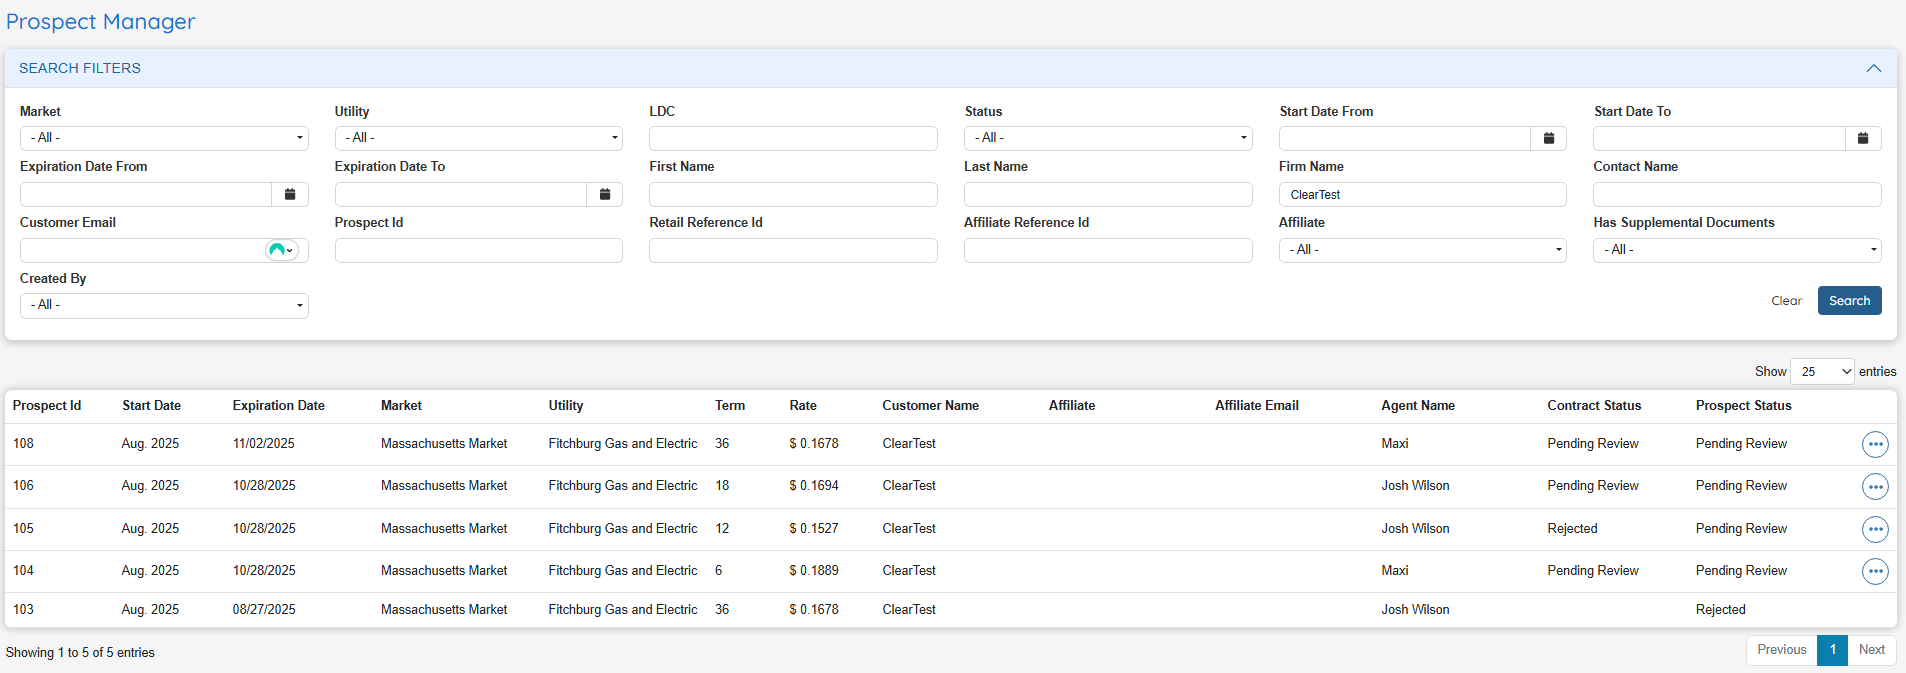
All Prospect history and management tools are located within the Prospect Manager.
Use the Search Filters to refine your results and quickly locate specific Prospects.
You can take actions by clicking any row of data, or access additional options through the Quick Action Menu (three dots). ![]()
Approving a Prospect
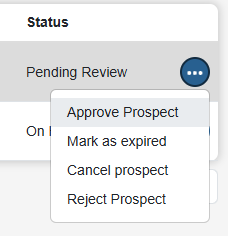
Before a Prospect can be approved, the Contract associated with it must first be approved. This approval can be completed from the Prospect Details screen.
If you try to approve the Prospect before the Contract is approved, an error message will appear.

Why approve the Prospect separately from the Contract?
-
If the REP rejects the Contract for any reason, the Broker can still upload an updated version and restart the approval process without cancelling the Prospect.
-
The Prospect represents the individual or company requesting service. Internal procedures such as credit checks, validation, or verification may require separate approval.
-
This ensures that both the Contract and the Prospect meet all requirements before final enrollment.
Rejecting a Prospect
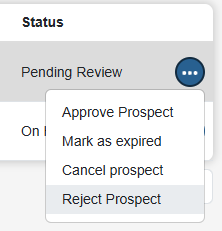
Unlike the approval process, a Prospect can be rejected at any time, regardless of the Contract status.
To reject a Prospect, select the Reject option from the ![]() menu.
menu.
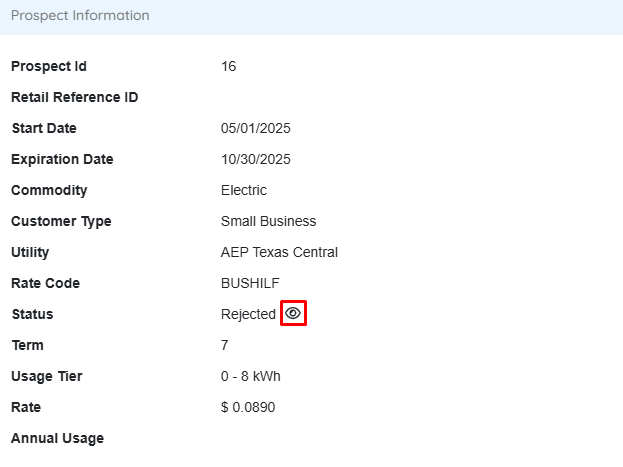
When a Prospect is rejected, the Broker can access the Disposition screen by clicking the eye icon under Prospect Information.
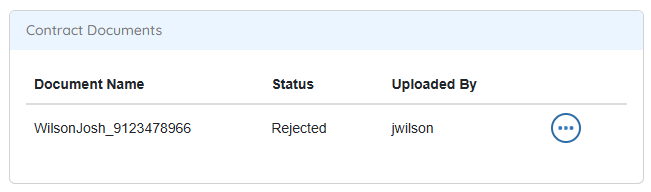
The Prospect status will automatically update to Rejected.
Note: Contract rejections do not currently use dispositions.
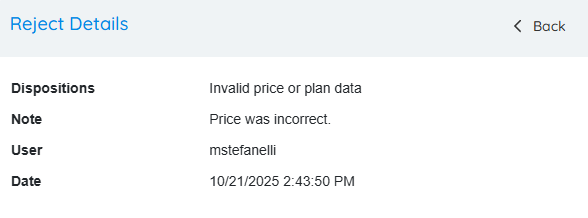
This is a sample of the Disposition view that a Broker or REP will see when clicking the eye icon.
The details displayed include the Disposition, Note, the REP user who performed the rejection, and a timestamp of the action.
Editing a Prospect

A Prospect can be edited if corrections or updates are needed.
To edit a Prospect, select the Edit Prospect option from the ![]() menu.
menu.
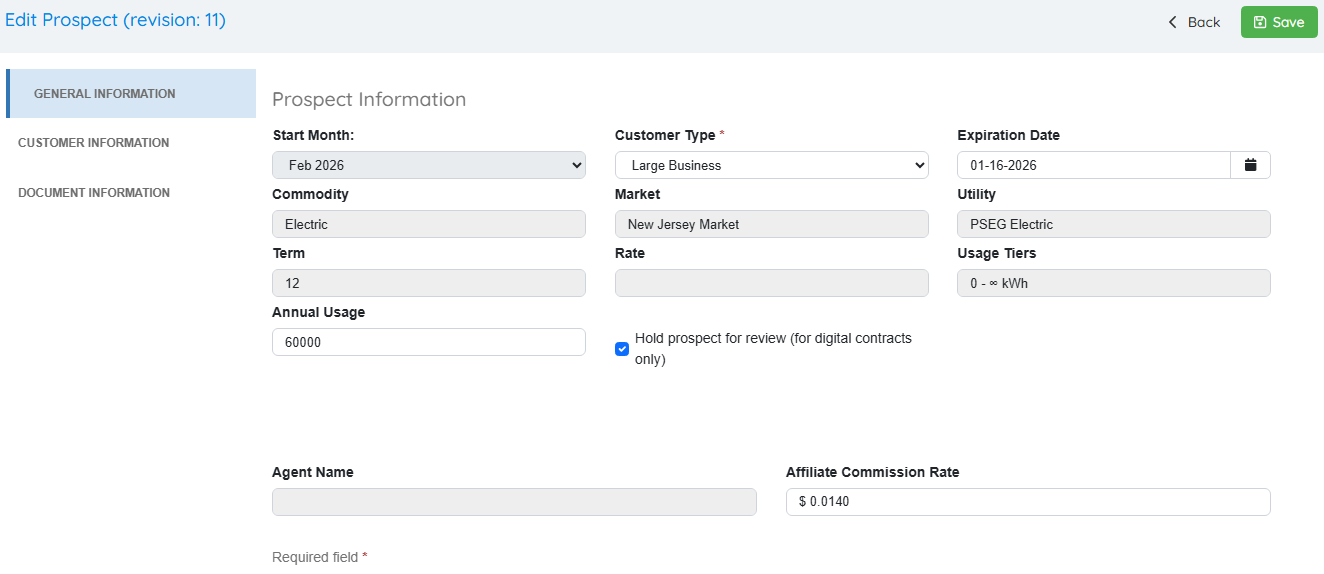
This opens the Edit Prospect screen, where you can modify:
- Prospect Information (Start Month, Customer Type, Expiration Date, etc.)
- Broker Online Exchange details (Affiliate Commission Rate)
The current revision number of the prospect is displayed in the page banner.
Note that some fields may remain locked depending on the prospect's status or role permissions. Once changes are made, click Save to update the prospect record.
Approving and Rejecting Contracts
![]()
The Accept and Reject actions for a Prospect are available in the Prospect Details menu.
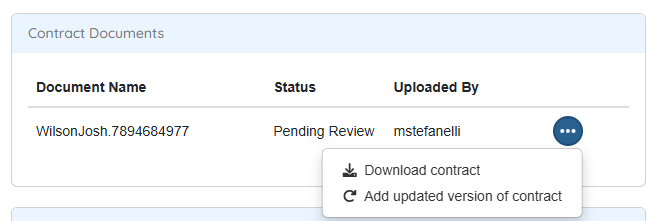
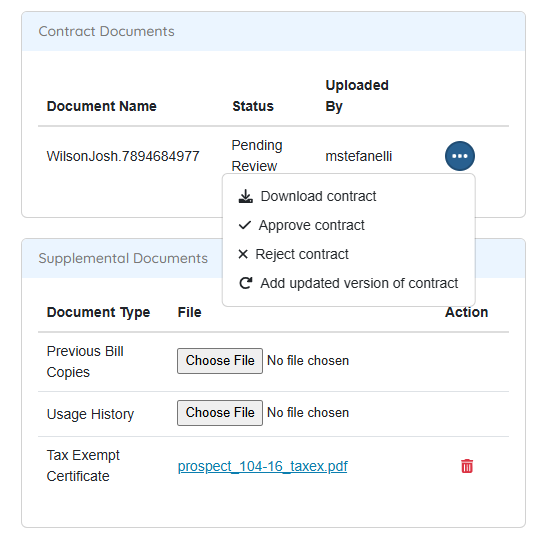
In Prospect Details > Contract Documents, expand the ![]() menu to view the available options:
menu to view the available options:
- Download Contract
- Approve Contract
- Reject Contract
- Add Updated Version of Contract
1. Reviewing and Approving a Contract

After reviewing the Contract (you may download the contract), navigate to the Contract Documents section.
From the ![]() menu, select Approve Contract to proceed with the approval process.
menu, select Approve Contract to proceed with the approval process.
|
|
|
|
|
|


Once both approvals are confirmed, the Prospect status will change to Completed, indicating it is ready for enrollment.
If only the Contract has been approved but the Prospect has not, the statuses will appear as follows:
- Contract: Approved
- Prospect: Pending Review
2. Rejecting a Contract
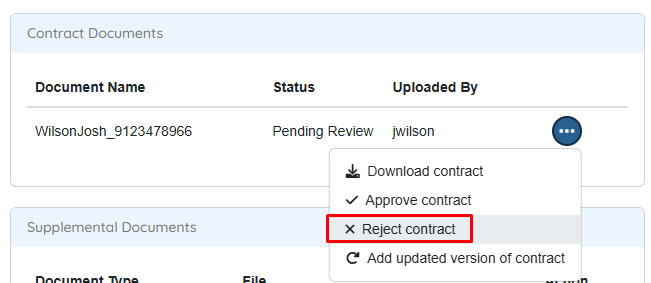
You can reject a contract from the Contract Documents menu.
There is no warning popup, and once the rejection is completed, you will be redirected to the main Prospect Manager page.
3. Replacing Rejected Contract from Prospect List
The Prospect List available to the Broker will continue to allow uploading a revised version of the contract as long as the Prospect has not been rejected.

In the Contract Documents section of the Prospect Details page (accessible to both Brokers and REPs), either party can upload a new version of the contract as long as the Prospect has not been fully rejected.
Reference Guide to Statuses
![]()
Prospect Statuses:
| Status | Description |
| Canceled | Canceled by either the supplier or affiliate. |
| Completed | Contract signed by both customer and supplier. |
| Expired | Signed agreement not received before pricing expiration. |
| On Hold | Prospect created, but contract not yet sent to the customer. |
| Partially Signed | Customer has signed, but the supplier has not. |
| Pending Review | Deal has been created but not yet signed. |
| Unsigned | Agreement sent to prospect, awaiting signature via DocuSign. |
Contract Statuses:
| Status | Description |
| Approved | Contract signed by both customer and supplier and accepted. |
| Rejected | Contract was rejected by the REP. |
| Replaced | Broker or REP has uploaded a new version of the contract. |
| Pending Review | Deal has been uploaded but no action has been taken. |
Additional Related Documentation
![]()
Please see the following documents for additional information regarding the Pricing Matrix and Prospect Process including system functionality and setup.
Affiliates and Pricing Matrix Setup
Documents and Autoresponders - Prospect Module
Physical Contract Upload - Walkthrough