2020-04 Release Notes
Iteration: 2020-04
April 27, 2020
What’s New?
| 3085 | The waive ETF option in Call Disposition can be made available for all queues. |
| 3673 | Increased zone name length from 1 character to 25 characters. |
| 3650 | Added LDC filter to Reduced Filter View of Customer Support. |
| 3189 | The reason code is no longer needed for customers that choose to drop or transfer from My Account; still required for users of OpsAdmin. |
| 3561 | Ability to postpone the payment of a deposit. |
| 3327 | New autoresponder trigger for required deposits. |
| \(^▽^)/ | Take payments with Authorize.Net and ESG |
| \(^▽^)/ | Manage more than a brand in OpsAdmin. |
Fixes and Improvements
| 3667 | Issue that prevented from viewing the ETF amount in Customer Support. |
| 3649 | Issue where the address will be saved with the city when using MCL in the Texas market. |
| 3679 | Issue that prevented from saving Affiliates changes when Pricing Matrix module was disabled. |
| 3640 | Error when trying to link two accounts from Customer Support. |
| ¯\_(ツ)_/¯ | Issue that prevented from creating and deleting utilities. |
| 3562 | Now the rates wizard will hide the selected plan section if a commodity hasn’t been selected. |
| 3640 | Several improvements to Transfer Of Service. |
| 3689 | The system no longer shows the customer Social Security Number to improve privacy and security. |
| ¯\_(ツ)_/¯ | Improved performance of MCL ESI ID search and minor UX improvements. |
Features & Fixes Details
The waive ETF option in Call Disposition can be made available for all queues
A couple of releases ago we added the ability to configure the dispositions and types for different categories such as Drops or Customer Notes. In the case of Drops, we also added the ability to configure the flow a drop can follow between queues for each disposition.
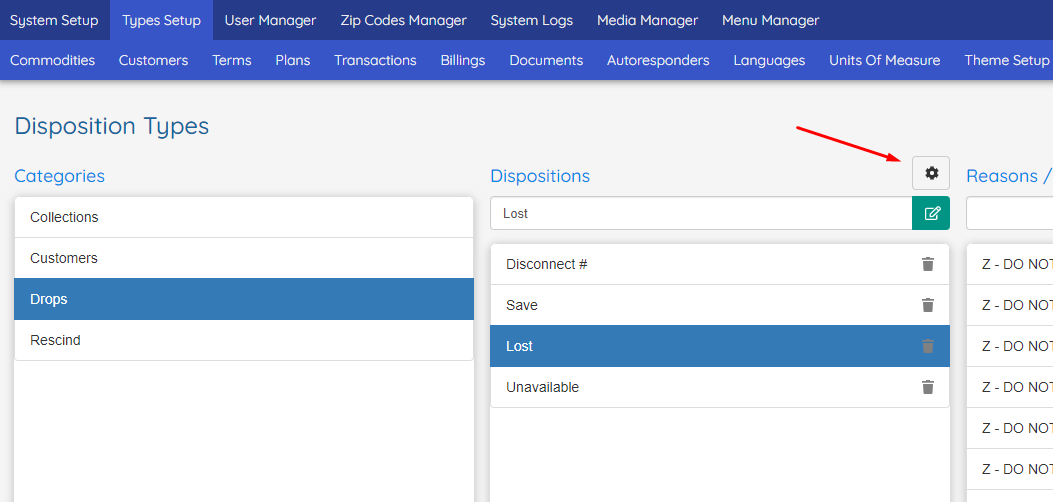
One option that wasn’t configurable was Waive ETF. This option was only available for the Lost disposition and depending on whether it was checked or not it allowed to move the drop to the ETF Invoice Queue or the Drop Archive.
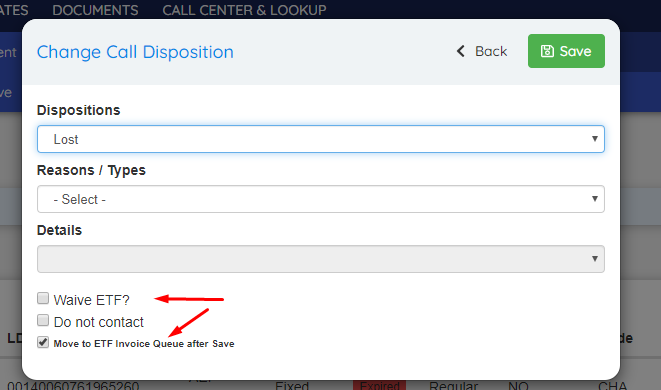
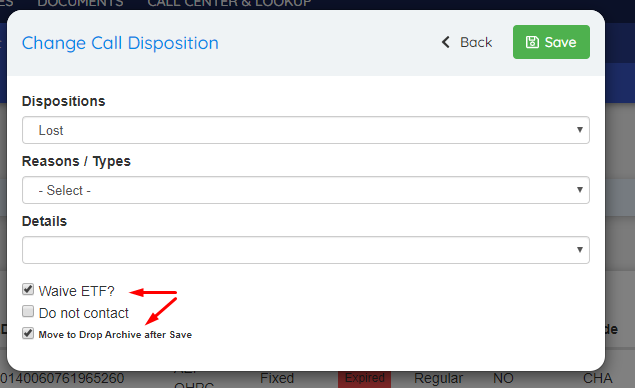
Now it is possible to make this option available for any disposition and configure the destination queue as desired.
By opening the Disposition Types Drop Queue configuration screen clicking the gear icon in the image of the previous page, it’s possible to configure the new flow:

For example, in this case, the _Waive ETF _checkbox will now be available for the Disconnect # disposition if the drop is in the ETF Invoice Queue and will move the drop the the Drop Archive after saving as it can be seen in the images below:
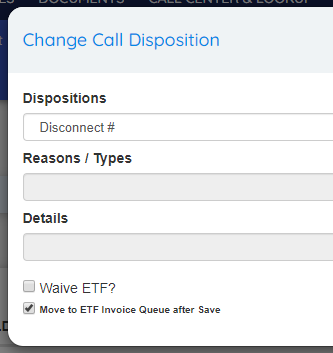
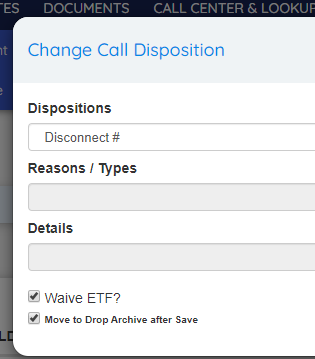
The only limitation is that only one combination of Source and Destination queue can exist for each disposition depending on the Waive ETF checkbox. For example, assuming that the configuration of the image above exists in the system, it won’t be possible to ALSO configure for the Disconnect # disposition and the Waive ETF selected, for example to send the drop from the Retention Queue to the Invoice Archive.
Added LDC filter to Reduced Filter View of Customer Support
Now the Reduced Filters configuration for Customer Support also allows to filter by LDC number and removed the checkbox that allowed to bring customers without enrollments:
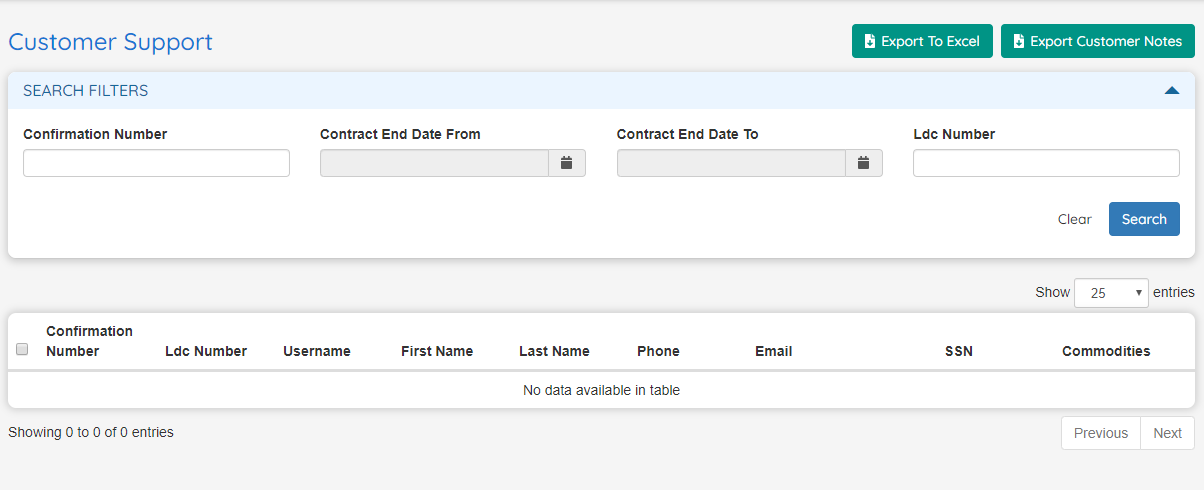
We fixed the search functionality with this view by forcing to use one of the filters to perform the search. Before this change, by simply clicking the search button the system would bring all the customers.
Also, when the screen loads, now it shows the table correctly initiated and empty instead of just showing the header.
Ability to postpone the payment of a deposit
The system has a new option that allows the customer to finish an enrollment and postpone the payment of the required deposit. To do this the customer simply has to select the third option in the Credit Check Result screen and will be able to continue the process.
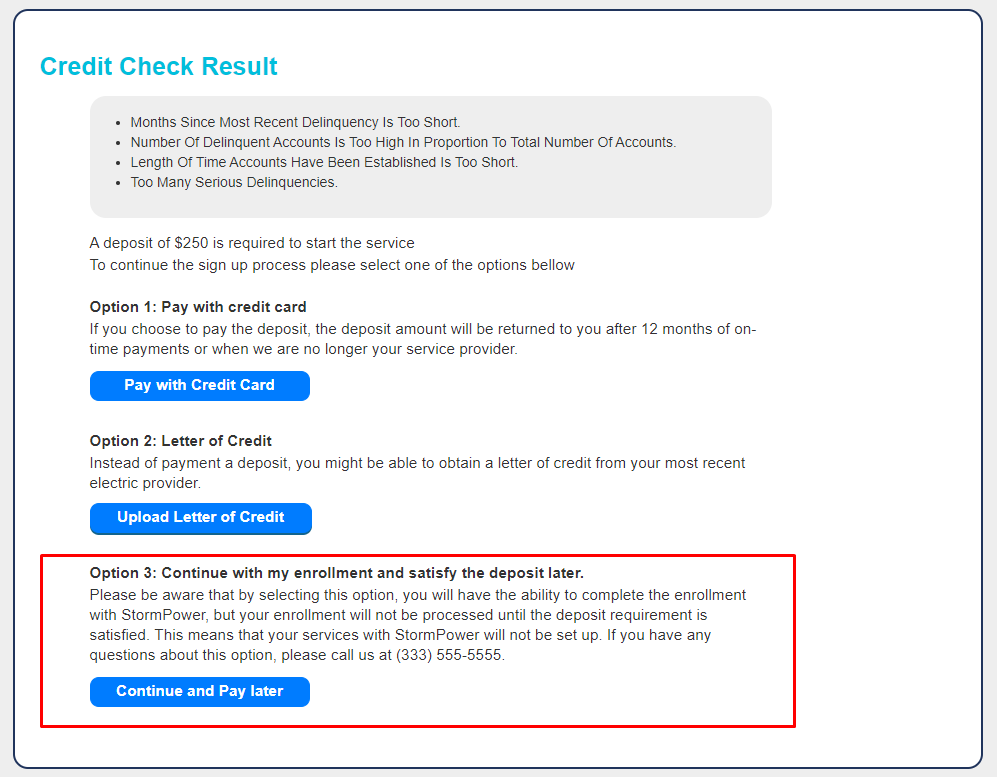 In this case, the enrollment will be saved with the new status On Hold - Deposit Pending.
This feature can be toggled in the system setup by changing the new configuration value Allow customers to satisfy the deposit later in the Credit Check process.
New autoresponder trigger for required deposits
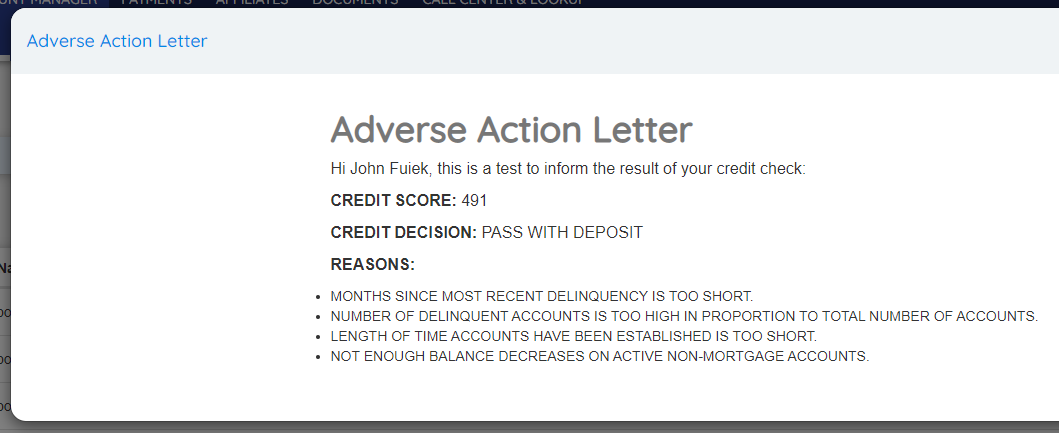
There is a new autoresponder trigger called Deposit Required. This trigger allows sending an email to the customers that enroll and are required to pay a deposit in order to receive the service.
For this trigger three new replacement values where added. Below there is a list of them and an example of the usage:
- Credit Score
- Credit Result: Will only return a value if Transunion is selected as the decision engine.
- Credit Reasons: Will only return a value if Transunion is selected as the decision engine.
Take payments with Authorize.Net and ESG
With the release of the 2020-01 iteration of OpsAdmin we added a new set of features required to operate in the ERCOT market. One of these features is Credit Check, which allows to obtain the credit score by connecting to Transunion during the enrollment process. This feature was built as part of the new Payments Module, and now we are completing this module by adding the payment functionality itself to OpsAdmin.
This new feature can be divided into two main parts: the ability to subscribe a customer to recurring billing using the service provided by ESG, and the ability to make one-time payments and handle credit card data by integrating Authorize.Net.
There are several Credit Check concepts that will be explained here again as the payment functionality is tightly related to it.
Initial Setup
The initial setup of Authorize.Net is very simple and the system only needs three values to connect to it:

The first option should remain with “Production Environment” selected. The “Test Environment” option should be used only for development purposes.
The other two values can be obtained from the Authorize.Net Merchant account by going to Account → API Credentials & Keys.
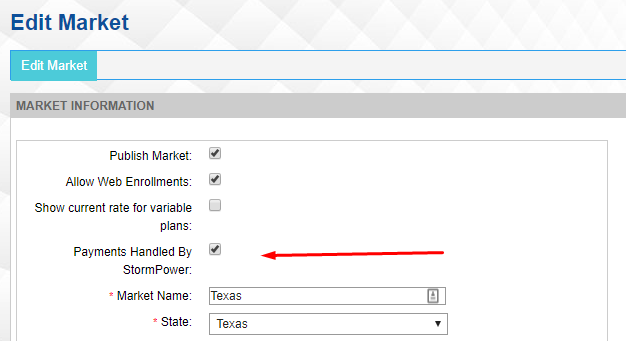
Finally, the payments functionality must be enabled at the market level:
Enrollment Process
The payment functionality is integrated into the enrollment process. For simplicity the documentation is focused on the Rates Wizard process, although the same functionality can be found on the Quick Enrollments Wizard.
Due to the customizable nature of OpsAdmin, the workflow of the payments functionality during the enrollment process can follow half a dozen of paths without considering possible errors. This document lists some of the scenarios the system can handle and then it presents the most complex scenario where the customer pays a deposit and subscribes to recurring billing.
To understand the different scenarios is important to remember the three possible options a customer can select when is required to pay a deposit due to a low credit score:
- Pay with credit card: The customer will satisfy the deposit during the completion of the enrollment process.
- Pay with a letter of credit: The customer will satisfy the deposit by uploading a letter of credit which will have to be manually reviewed by an agent of the retail company.
- Satisfy the deposit later: The customer will be able to pay the deposit from the My Account site or Customer Support if he contacts the company.
Some possible scenarios are:
- Payments are handled by the utility and not the retail company: The process has no change at all, both payments and Credit Check are disabled for the market.
- Payments are handled by the retail company and subscribing to recurring billing is required:
- Credit Check is disabled or the customer doesn’t have to pay a deposit: The customer will be presented with a payment screen at the end of the enrollment process to subscribe to recurring billing and the enrollment is sent to ESG.
- The customer has to pay a deposit and decides to pay with a credit card: The customer will be presented with a payment screen at the end of the enrollment process to pay the deposit and to subscribe to recurring billing with the same payment method; and the enrollment is sent to ESG.
- The customer pays a deposit with a letter of credit or decides to postpone the deposit: The customer will be presented with a payment screen at the end of the enrollment process to subscribe to recurring billing but the enrollment won’t be sent to ESG until the deposit is paid.
- Payments are handled by the retail company but subscribing to recurring billing is optional:
- Credit Check is disabled or the customer doesn’t have to pay a deposit: If the customer accepts to subscribe, then he will be presented with a payment screen at the end of the enrollment process. Whether he decides to subscribe or not, the enrollment is sent to ESG.
- The customer has to pay a deposit and decides to pay with a credit card: The customer will be presented with a payment screen at the end of the enrollment process to pay the deposit and, if he chooses so, to subscribe to recurring billing with the same payment method; finally the enrollment is sent to ESG.
- The customer pays a deposit with a letter of credit or decides to postpone the deposit: If the customer accepts to subscribe, then he will be presented with a payment screen at the end of the enrollment process but the enrollment won’t be sent to ESG until the deposit is paid.
Below is presented the scenario where the customer has to pay the deposit and subscribe to recurring billing starting from the credit check result screen:
Once the customer has reached the part of the enrollment process where the system requests permission to perform a credit check if the customer accepts, the system will proceed and present the following screen in case a deposit is required:
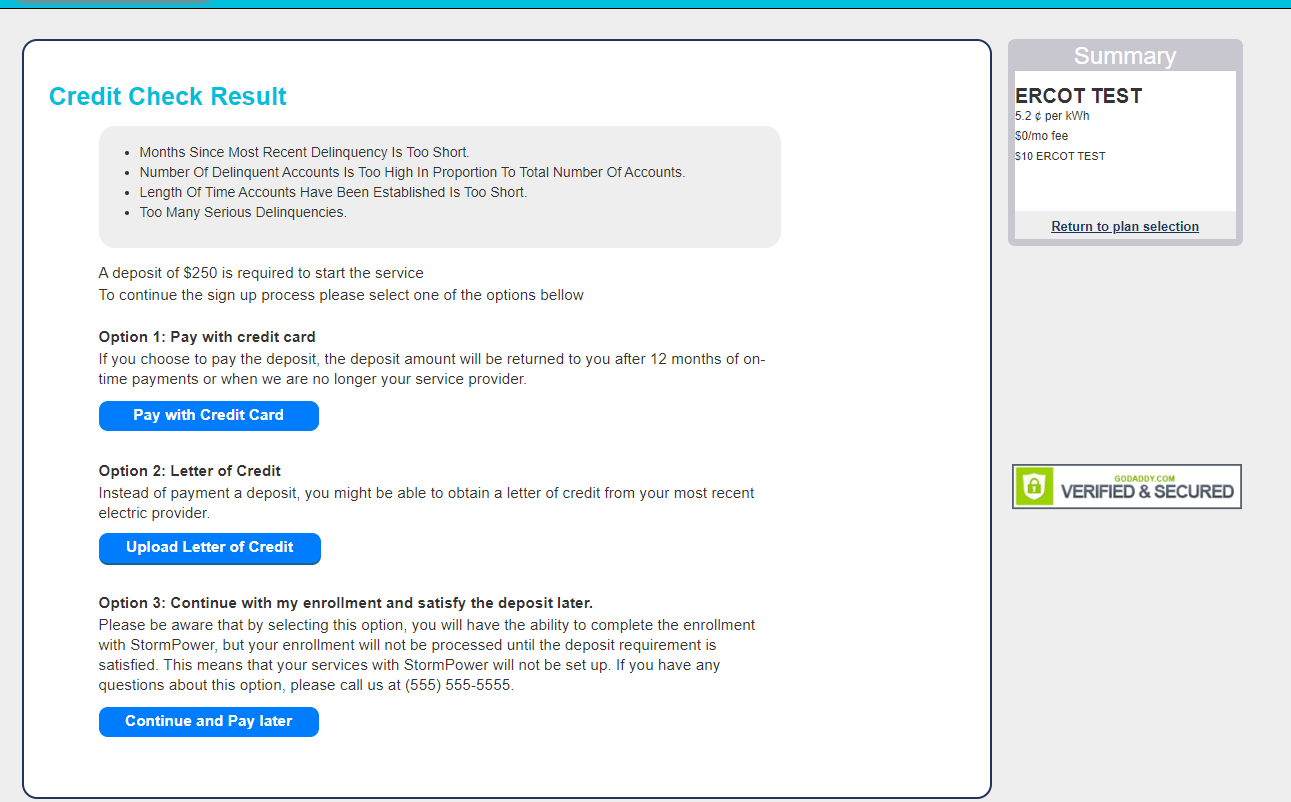
Here the customer has to choose one of three options. Pay with Credit Card will make the system charge the deposit in the next step, and is the process that will be explained next. The second option simply requires uploading a letter of credit and the third one allows the customer to assess the deposit from MyAccount after completing the enrollment process. With the second and third option, the customer still needs to provide his credit card data to subscribe to recurring billing.
If the customer selected the first option, the system will redirect him to the summary page, where the new payments options will be added at the end:
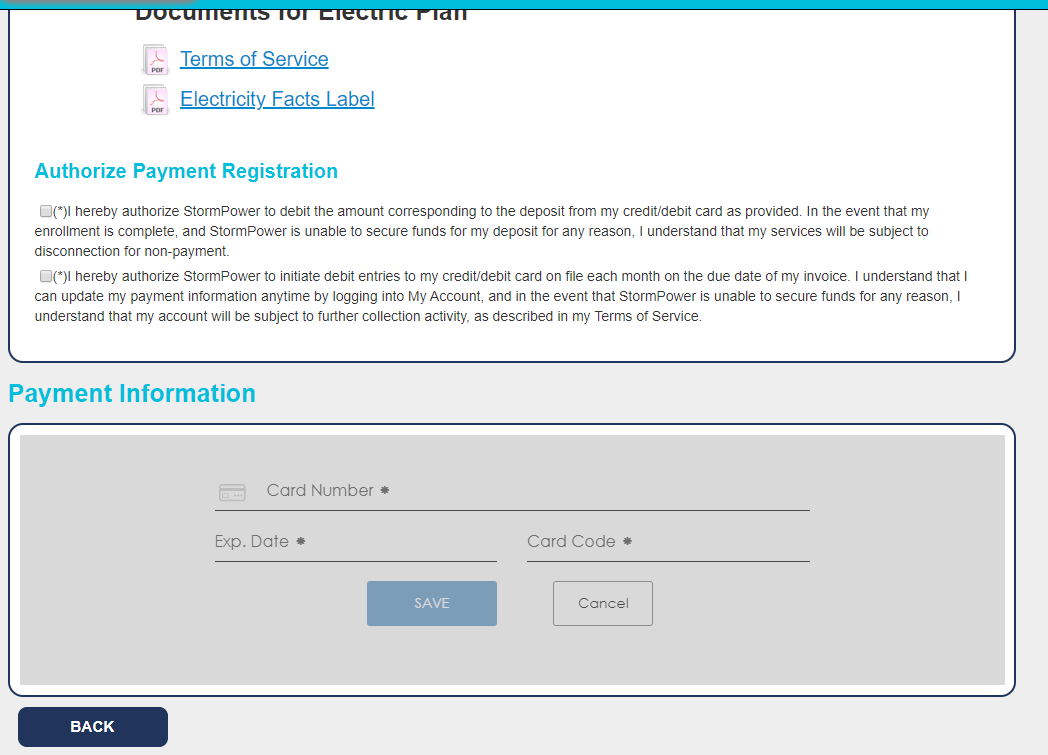
Two new checkboxes are shown, the first one to give permission to Titan to debit the deposit from the credit card, and the second one to subscribe to the recurring payment to that same credit card. In this release of the system, both transactions have to be made with the same credit card. Only when both checkboxes are checked, the system will allow to add the credit card data:
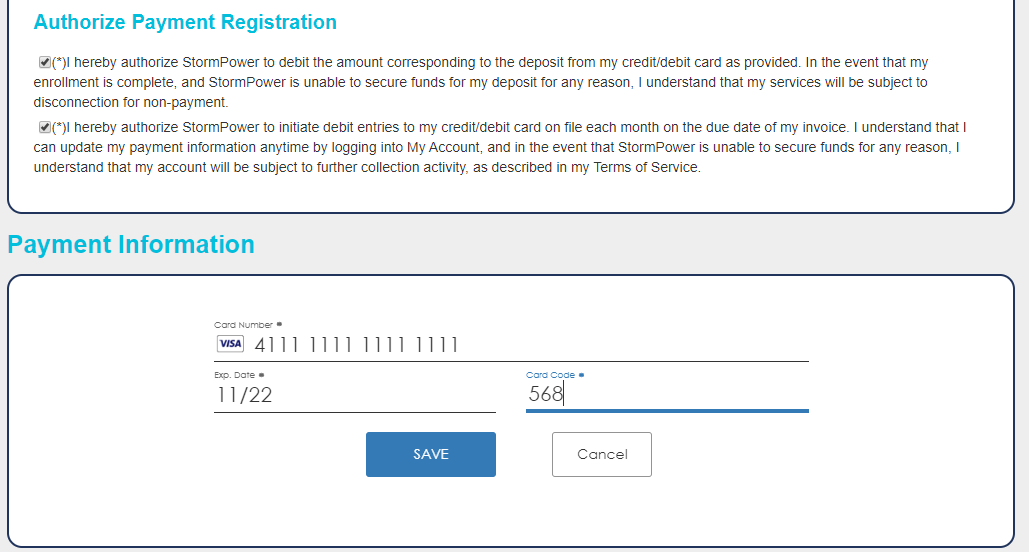
The credit card data is added using Authorize.Net form which allows better PCI compliance. This form allows users to input, send and store credit card information to Authorize.Net without having OpsAdmin to interact directly with it.
The system follows the following basic process:
- Save credit card information in Authorize.Net
- Charge the deposit by generating an Authorize Only transaction.
- Send the enrollment to ESG. In this process OpsAdmin also sends a token that represents the credit card and this is used by ESG to generate the recurring billing.
- Update the enrollment with Pending status.
OpsAdmin Service
Every day the system validates the generated enrollments against ESG and if everything is correct, the enrollment status is updated to accepted.
After the enrollment has been marked as such, the payment process can be finished for that particular enrollment:
- A new transaction is generated in Authorize.Net updating the deposit payment to Captured, allowing Authorize.Net to settle that transaction.
- Inform the payment of the deposit to ESG.
Manage more than a brand in OpsAdmin
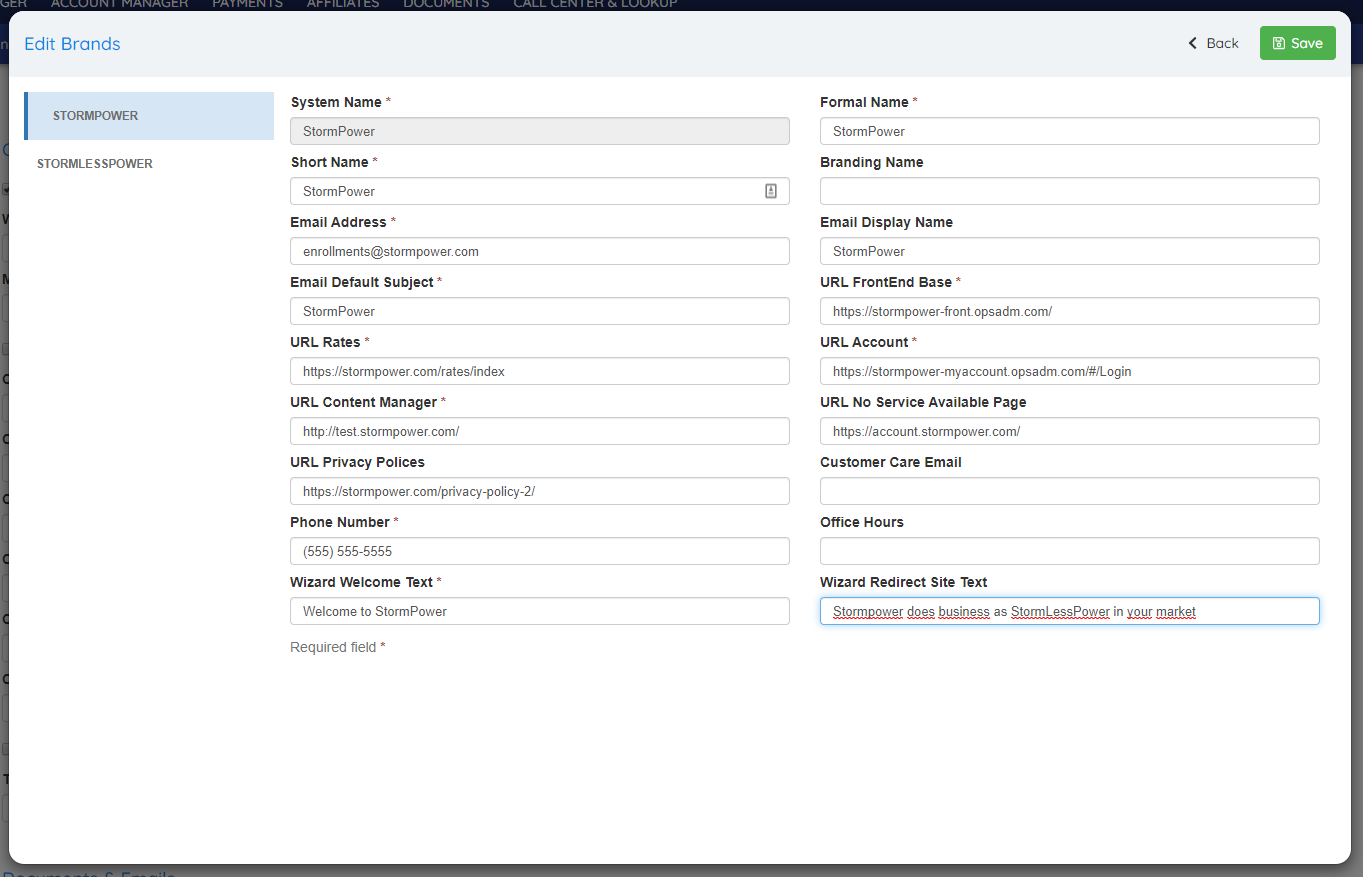
Now the system has the capability to to work with more than a brand. This means that it is possible to have different rates wizards with different branding connected to the same database and managed by the same admin site.
To be able to manage several brands, it is necessary to contact Stormcrest to set up the new sites, but once it’s done there are several configurations that can be updated from the admin site. To do this, go to System Setup and select the option Config Brands, this will open the following screen.
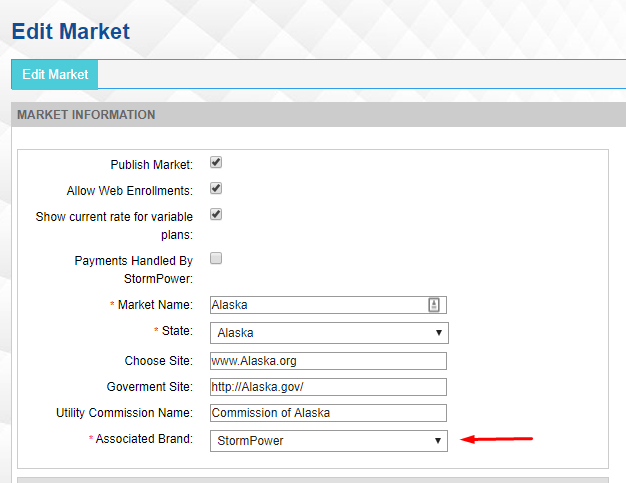
Finally to determine which market operates under each brand, the user must change the corresponding field in the Market Manager:
Now the rates wizard will hide the selected plan section if a commodity hasn’t been selected
During the enrollment process the Rates Wizard shows a summary of the selected plans to the left:
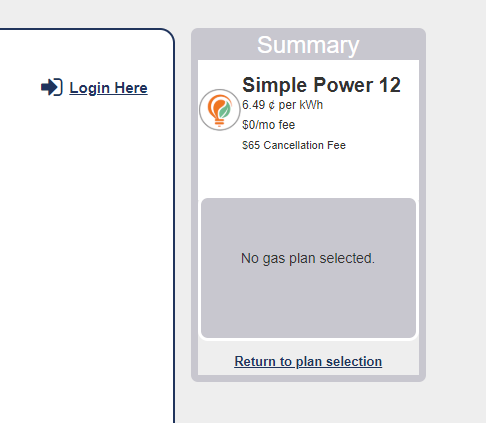
From now on the system will only show the the space corresponding to the selected plans:
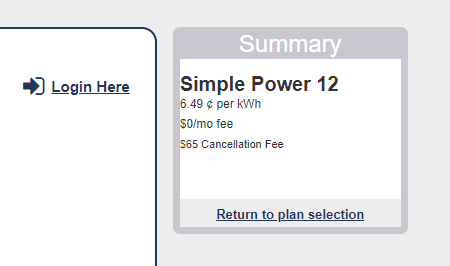
This applies both to the desktop and mobile view of the Rates Wizard.
Several improvements to Transfer Of Service
Several improvements were made to Transfer Of Service. Some labels were renamed and better explained what the field represent. Also the Unit / Suit / Apt. field is no longer required. Finally now the system shows a confirmation message that the Transfer Of Service was saved correctly.
